Oh. My. Goodness. Friends, prepare to have your minds blown! These aren’t just any chicken tenders – they’re juicy little miracles soaked in tangy pickle brine and dusted with the most addictive ranch seasoning blend you’ll ever taste. The first time I made these for my family, they literally disappeared in minutes (I barely got one for myself!). The pickle juice works absolute magic, creating the most tender, flavorful chicken that puts regular tenders to shame. Trust me, once you try this technique, you’ll never look at that jar of pickle juice the same way again!
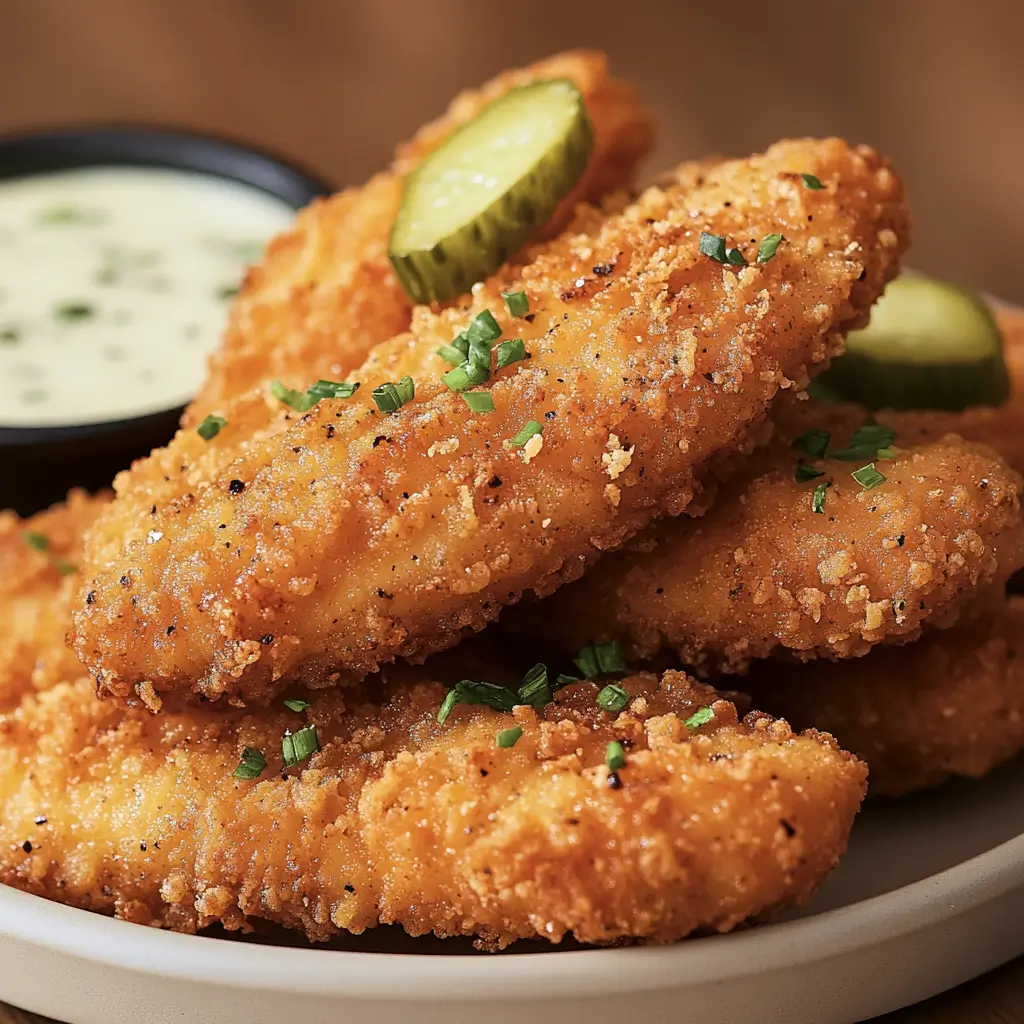
Table of Contents
Why You’ll Love This Recipe
- These tenders stay incredibly moist on the inside with a perfect crispy coating – no more dry, bland chicken!
- It’s a brilliant way to repurpose pickle juice you’d normally pour down the drain.
- The ranch dust seasoning creates an irresistible flavor that’s way better than anything store-bought.
- They’re quick enough for weeknights but impressive enough for guests who’ll beg for your secret.
Ingredients
For the Pickle Brine:
- Dill pickle juice – the star of the show that tenderizes and flavors the chicken (use the good stuff!).
- Garlic cloves – adds depth to the brine without overpowering.
- Black peppercorns – for a gentle kick of spice.
- Honey – balances the acidity with just a touch of sweetness.
For the Chicken:
- Chicken tenders – look for ones that are similar in size for even cooking.
- All-purpose flour – creates the first layer of our crispy coating.
- Eggs – the glue that holds everything together.
- Panko breadcrumbs – the secret to that irresistible crunch.
- Vegetable oil – for frying to golden perfection.
For the Ranch Dust:
- Buttermilk powder – gives that authentic ranch tang without the moisture.
- Dried dill – the defining herb in ranch flavor.
- Dried parsley – adds color and a fresh note.
- Garlic powder – for that savory depth.
- Onion powder – rounds out the ranch profile perfectly.
- Salt and pepper – enhances all the other flavors.
The full ingredient list with measurements will be available in the recipe card below.
How to Make the Recipe
- Prepare the brine: Combine pickle juice, smashed garlic cloves, peppercorns, and honey in a large bowl or zip-top bag. Whisk or shake until honey dissolves completely.
- Brine the chicken: Add your chicken tenders to the brine, making sure they’re fully submerged. Seal and refrigerate for at least 2 hours, but ideally overnight. The longer they soak, the more flavorful and tender they’ll become!
- Mix the ranch dust: While the chicken is brining, combine all your ranch dust ingredients in a small bowl. This magical dust keeps well in an airtight container, so feel free to make extra for future snacking emergencies!
- Set up your coating station: When you’re ready to cook, arrange three shallow dishes: one with flour seasoned with a pinch of salt and pepper, one with beaten eggs, and one with panko breadcrumbs mixed with about 2 tablespoons of your ranch dust.
- Coat the chicken: Remove the tenders from the brine and pat them dry with paper towels. Dredge each tender in flour, then egg, then the panko-ranch mixture, pressing gently to help the coating adhere.
- Cook the tenders: Heat oil in a large skillet over medium-high heat until shimmering (about 350°F if you have a thermometer). Working in batches to avoid crowding, fry the tenders for about 3-4 minutes per side until they’re deeply golden brown and cooked through to 165°F internally.
- Dust and serve: Transfer the cooked tenders to a paper towel-lined plate to drain excess oil. While they’re still hot, sprinkle them generously with more ranch dust so it sticks to the warm surface. Serve immediately for maximum crunch factor!
Pro Tips for Making the Recipe
Don’t throw away leftover pickle juice from store-bought pickles – save it in the fridge specifically for this recipe! Different pickle flavors (dill, garlic, spicy) will give your chicken different flavor profiles.
The key to super crispy tenders is making sure your oil is hot enough before adding the chicken. Too cool, and they’ll absorb oil and get soggy. Test with a pinch of breadcrumbs – it should sizzle immediately!
Want to make these healthier? You can absolutely bake them instead! Arrange on a wire rack over a baking sheet, spray with cooking oil, and bake at 425°F for about 15-18 minutes, flipping halfway.
For extra ranch flavor that goes through and through, add a tablespoon of ranch dust to your flour dredge too. It’s like a flavor insurance policy!
How to Serve
These tenders are absolute showstoppers served hot with extra ranch dust sprinkled on top and your favorite dipping sauce on the side. I love offering a few options – classic ranch dressing (obviously!), honey mustard, or even a spicy buffalo sauce for heat lovers.
Make it a meal by serving alongside a crisp slaw dressed simply with vinegar and olive oil – the freshness cuts through the richness perfectly.
For a fun presentation at parties, stand the tenders up in a tall glass with dipping sauces in small bowls nearby. Watch them disappear in minutes!
These also make incredible sliders – just tuck a tender into a small potato roll with lettuce, tomato, and a smear of mayo mixed with a pinch of your ranch dust.
Make Ahead and Storage
Make ahead options: You can brine the chicken up to 24 hours in advance – in fact, longer brining means more flavor! The ranch dust can be made up to a month ahead and stored in an airtight container.
Refrigerator: Cooled tenders will keep in an airtight container for 3-4 days. Layer them between paper towels to prevent sogginess.
Freezer: These freeze beautifully! Arrange cooled tenders on a baking sheet and freeze until solid, then transfer to a freezer bag. They’ll keep for up to 3 months.
Reheating: For the crispiest results, reheat refrigerated or thawed tenders in a 375°F oven for 10-12 minutes. Avoid the microwave which will make them soggy. After reheating, give them a fresh sprinkle of ranch dust to revive the flavor!
FAQs
Can I use pickle juice from any type of pickles for this recipe?
Absolutely! While I typically use dill pickle juice for its classic tangy flavor, you can experiment with whatever pickle variety you love. Bread and butter pickle juice will give a sweeter profile, while spicy pickle brine adds a nice kick. The most important thing is using a good quality pickle juice you enjoy the taste of, since it will definitely impart its flavor to your chicken. Just avoid using extremely sweet varieties as they might burn more easily when cooking.
I don’t have buttermilk powder for the ranch dust. Is there a substitute?
Don’t worry if you can’t find buttermilk powder! You can substitute dry milk powder with a teaspoon of lemon juice or vinegar mixed in to simulate that tangy buttermilk flavor. In a pinch, you could also use a ranch dressing mix packet, though I find homemade dust has a fresher flavor and lets you control the salt level. If you’re feeling adventurous, nutritional yeast makes an interesting dairy-free alternative that adds a similar savory quality, though the flavor will be slightly different.
How long should I really brine the chicken? Is 30 minutes enough?
While you’ll get some flavor benefit from even a quick 30-minute brine, I highly recommend giving it at least 2 hours for the pickle juice to work its magic. The sweet spot seems to be 4-8 hours, which allows the chicken to absorb plenty of flavor and become remarkably tender. You can absolutely go overnight (up to 24 hours) if that timing works better for your schedule. Just be aware that extremely long brines (beyond 24 hours) can sometimes make the texture too soft. The good news is this recipe is pretty forgiving on timing!
Can I make these gluten-free?
You definitely can make these gluten-free with just a few simple swaps! Replace the all-purpose flour with your favorite gluten-free flour blend, and substitute the panko breadcrumbs with gluten-free panko (now available in many grocery stores) or crushed gluten-free cornflakes for that amazing crunch. Just double-check your pickle juice ingredients as well, as some brands might contain trace gluten. The ranch dust ingredients are naturally gluten-free, so no changes needed there. My gluten-sensitive friends actually prefer these to regular chicken tenders because the pickle brine makes them so wonderfully moist!

Pickle-Brined Chicken Tenders with Ranch Dust
Equipment
- Large Bowl or Zip-Top Bag
- Skillet or Deep Fryer
- Tongs
- Paper Towels
- Mixing bowls
- Thermometer
Ingredients
For the Pickle Brine
- 1 cup dill pickle juice
- 2 cloves garlic smashed
- 1 teaspoon black peppercorns
- 1 tablespoon honey
For the Chicken
- 1 lb chicken tenders
- 1/2 cup all-purpose flour
- 2 eggs beaten
- 1 1/2 cups panko breadcrumbs
- vegetable oil for frying
For the Ranch Dust
- 2 tablespoons buttermilk powder
- 1 teaspoon dried dill
- 1 teaspoon dried parsley
- 1 teaspoon garlic powder
- 1 teaspoon onion powder
- 1/2 teaspoon salt
- 1/4 teaspoon black pepper
Instructions
- Combine pickle juice, smashed garlic, peppercorns, and honey in a bowl or bag. Stir until honey dissolves.
- Add chicken tenders to the brine, making sure they’re submerged. Seal and refrigerate for at least 2 hours or overnight.
- Mix all ranch dust ingredients in a bowl. Store in an airtight container if making ahead.
- Set up a breading station: one bowl with seasoned flour, one with beaten eggs, and one with panko mixed with 2 tablespoons of ranch dust.
- Remove chicken from brine and pat dry. Dredge in flour, then egg, then press into panko mixture to coat well.
- Heat oil to 350°F in a skillet. Fry tenders 3–4 minutes per side until golden and internal temp is 165°F.
- Transfer to paper towel-lined plate. Sprinkle hot tenders with additional ranch dust and serve immediately.