Oh my goodness, ladies, I’ve outdone myself this time! This Strawberry Banana Crunch Pudding Cheesecake is what happens when all your favorite desserts decide to have a family reunion on your plate! The first time I served this at my sister’s birthday gathering, the whole room went completely silent for a full minute—then erupted into a chorus of “WOWs” and “Oh my stars!” This spectacular creation combines the creamy dreaminess of banana pudding, the sweet-tart magic of strawberries, and that nostalgic strawberry crunch coating that takes us straight back to childhood ice cream treats. Every bite delivers layers of flavor and texture that’ll make your taste buds do a happy dance! Trust me when I say this isn’t just a dessert; it’s an experience that’ll have your family and friends begging for the recipe. Fair warning: once you’re known for bringing this cheesecake, you’ll never be allowed to bring anything else to gatherings again!
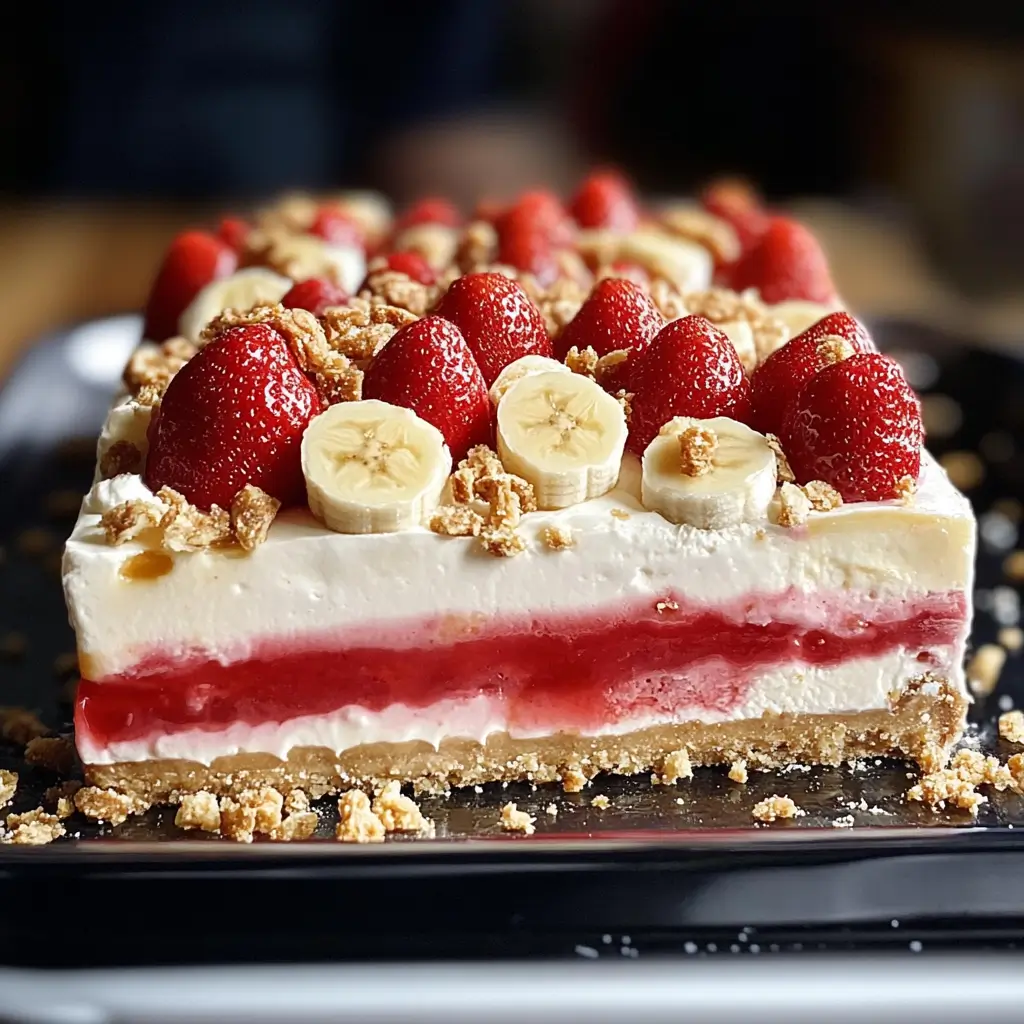
Table of Contents
Why You’ll Love This Recipe
- It combines three beloved desserts – creamy cheesecake, nostalgic banana pudding, and strawberry shortcake ice cream bars
- The contrasting textures of silky cheesecake, fresh fruit, and crunchy topping create an exciting eating experience
- The stunning presentation with pink strawberry crunch coating and fresh fruit makes it perfect for special occasions
- The flavors are universally loved across generations – everyone from kids to grandparents will be impressed!
Ingredients
For the Cookie Crust:
- Vanilla wafer cookies – creates the perfect foundation with their subtle sweetness and nostalgic flavor
- Graham crackers – adds structure and that classic cheesecake base flavor
- Butter – binds everything together while adding rich flavor
- Sugar – enhances the sweetness and helps create that perfect texture
- Salt – balances the sweetness and brings out all the flavors
For the Banana Pudding Layer:
- Instant banana pudding mix – provides intense banana flavor and creamy texture
- Milk – activates the pudding mix for that perfect consistency
- Vanilla extract – adds depth and enhances the banana flavor
- Fresh bananas – the star of the show with their natural sweetness and authentic flavor
- Vanilla wafer cookies – creates those classic banana pudding pockets of softened cookie goodness
For the Strawberry Cheesecake Layer:
- Cream cheese – the foundation of any great cheesecake, providing that perfect tangy creaminess
- Sugar – sweetens the filling to balance the tanginess of the cream cheese
- Eggs – provides structure and richness
- Sour cream – creates that velvety smooth texture we all love in cheesecake
- Vanilla extract – enhances all the flavors
- Fresh strawberries – adds natural strawberry flavor and beautiful color
- Strawberry gelatin powder – intensifies the strawberry flavor and adds vibrant color
- Heavy cream – makes the cheesecake extra silky and rich
For the Strawberry Crunch Topping:
- Golden Oreos – creates the perfect base for our crunchy topping
- Freeze-dried strawberries – adds intense strawberry flavor without adding moisture
- Butter – helps the crumbs hold together and adds richness
- Strawberry gelatin powder – enhances the strawberry flavor and creates that iconic pink color
For the Whipped Cream Topping:
- Heavy cream – whips up into fluffy clouds for decorating
- Powdered sugar – sweetens the cream without adding graininess
- Vanilla extract – rounds out the flavor profile
- Fresh strawberries and banana slices – for that beautiful, appetizing garnish
The full ingredient list with measurements will be available in the recipe card below.
How to Make the Recipe
Making the Cookie Crust:
- Preheat your oven to 325°F and prepare a 9-inch springform pan by spraying with non-stick spray.
- In a food processor, combine vanilla wafers and graham crackers, pulsing until they become fine crumbs.
- Add melted butter, sugar, and salt, then pulse until the mixture resembles wet sand.
- Press the mixture firmly into the bottom and about 1 inch up the sides of your springform pan.
- Bake for 10 minutes, then set aside to cool while you prepare the filling layers.
For the Banana Pudding Layer:
- In a medium bowl, whisk together the instant banana pudding mix and cold milk for 2 minutes until thickened.
- Fold in vanilla extract and refrigerate for 5 minutes to set slightly.
- Slice two ripe bananas into thin rounds.
- Arrange a layer of vanilla wafers on top of the cooled crust.
- Layer half of the banana slices on top of the wafers.
- Carefully spread the banana pudding mixture over the banana slices.
- Top with another layer of vanilla wafers, pressing them slightly into the pudding.
- Refrigerate while you prepare the cheesecake layer.
For the Strawberry Cheesecake Layer:
- Reduce oven temperature to 300°F.
- In a blender or food processor, puree fresh strawberries until smooth. Set aside.
- In a large bowl, beat cream cheese until smooth and creamy, about 2 minutes.
- Gradually add sugar and beat until fully incorporated and mixture is fluffy.
- Add eggs one at a time, beating well after each addition.
- Mix in sour cream and vanilla extract until just combined.
- In a small bowl, mix strawberry puree with strawberry gelatin powder until dissolved.
- Fold the strawberry mixture into the cheesecake batter until fully incorporated and you have a beautiful pink color.
- Gently pour the cheesecake mixture over the chilled banana pudding layer.
Baking the Cheesecake:
- Place your springform pan on a larger baking sheet (to catch any leaks).
- Bake at 300°F for about 70-80 minutes, or until the edges are set but the center still has a slight jiggle.
- Turn off the oven, crack the door open, and let the cheesecake cool in the oven for 1 hour (this helps prevent cracking).
- Remove from oven and cool completely at room temperature.
- Refrigerate for at least 6 hours or overnight.
Making the Strawberry Crunch Topping:
- In a food processor, pulse Golden Oreos until they become coarse crumbs.
- Add freeze-dried strawberries and pulse until they’re broken down into small pieces.
- Transfer to a bowl and stir in strawberry gelatin powder.
- Drizzle in melted butter and mix until the crumbs are moistened.
- Spread on a baking sheet and bake at 350°F for about 5-7 minutes, until slightly toasted and fragrant.
- Let cool completely – it will crisp up as it cools.
For the Whipped Cream Topping:
- In a chilled bowl, whip heavy cream until soft peaks form.
- Add powdered sugar and vanilla extract, then continue whipping until stiff peaks form.
- Transfer to a piping bag fitted with a star tip.
Assembling the Cheesecake:
- Once your cheesecake is fully chilled, gently remove it from the springform pan.
- Press the strawberry crunch mixture onto the sides of the cheesecake, working from the bottom up.
- Pipe decorative swirls of whipped cream around the top edge of the cheesecake.
- Garnish with alternating fresh strawberry halves and banana slices.
- Sprinkle any remaining strawberry crunch mixture in the center of the cheesecake.
- Refrigerate until ready to serve.
Pro Tips for Making the Recipe
- Use bananas that are ripe but still firm – they should be yellow with just a few brown spots for the best flavor without getting mushy
- To prevent your bananas from browning in the pudding layer, toss them with a teaspoon of lemon juice before adding to the cheesecake
- For the cleanest slices, dip your knife in hot water and wipe dry between each cut
- Allow all refrigerated ingredients to come to room temperature before mixing the cheesecake batter – this prevents lumps
- The strawberry crunch coating is best added just a few hours before serving for maximum crunch factor
- If you can’t find freeze-dried strawberries, you can substitute with crushed freeze-dried mixed berries or strawberry cake mix
How to Serve
This Strawberry Banana Crunch Pudding Cheesecake deserves a special presentation:
- Serve chilled but not ice cold – take it out of the refrigerator about 20 minutes before serving to let the flavors bloom
- Place on a decorative cake stand with fresh strawberries and banana slices arranged around the base
- For an extra special touch, offer a small pitcher of warm strawberry sauce on the side for drizzling
- Pair with a glass of prosecco or a fruity dessert wine for adult gatherings
- For family celebrations, serve alongside scoops of vanilla ice cream for those who want to make it even more decadent
This showstopper is perfect for spring and summer gatherings, Mother’s Day, baby showers, or anytime you need an impressive dessert that combines nostalgic flavors with wow factor!
Make Ahead and Storage
Make Ahead:
- The cheesecake (without the crunch coating) can be made up to 2 days ahead and stored in the refrigerator
- The strawberry crunch coating can be made up to 1 week ahead and stored in an airtight container at room temperature
- For best results, apply the crunch coating and whipped cream decorations no more than a few hours before serving
Storage:
- Store leftover cheesecake in an airtight container in the refrigerator for up to 3-4 days
- Be aware that the banana slices will darken over time and the crunch coating will gradually soften
- For the best visual appeal and texture, this cheesecake is best enjoyed within 2 days of assembly
Freezing:
- The baked and cooled cheesecake (without banana slices, crunch coating, or decoration) can be frozen for up to 1 month
- Wrap tightly in plastic wrap, then aluminum foil to prevent freezer burn
- Thaw overnight in the refrigerator, then add fresh banana slices, crunch coating, and decorations before serving
FAQs
Can I make this recipe without the banana layer if someone doesn’t like bananas?
Absolutely! This recipe is wonderfully adaptable. You can easily make it as a pure strawberry crunch cheesecake by omitting the banana pudding layer entirely and doubling the strawberry cheesecake portion. Or, for a fun variation, replace the banana pudding with vanilla pudding mixed with crushed vanilla wafers for a “cookies and cream” layer instead. The strawberry cheesecake and crunch topping are delicious enough to stand on their own! Just adjust your baking time accordingly since the cheesecake layer will be thicker without the banana pudding base.
The recipe seems complicated. Can I break it down into steps over multiple days?
This is actually the perfect make-ahead dessert! You can easily spread the preparation over 2-3 days to make it more manageable. On day one, make and bake the crust and prepare the banana pudding layer. On day two, make and bake the cheesecake layer and let it chill overnight. On day three (serving day), prepare the strawberry crunch coating, apply it to the sides of the cheesecake, and add the whipped cream and fresh fruit decoration. Breaking it down this way makes it much less overwhelming, and the flavor actually improves with that extra chilling time!
My strawberry layer didn’t turn as pink as I expected. What happened?
The pink color comes primarily from the strawberry gelatin and fresh strawberries. If your cheesecake isn’t as vibrantly pink as you’d like, it could be that your strawberries weren’t deeply colored or ripe enough. Next time, try adding 1-2 drops of pink food coloring to enhance the color, or look for particularly ripe, dark red strawberries. You could also increase the amount of strawberry gelatin slightly. Remember that the flavor is more important than the color, and a naturally pale pink cheesecake often tastes better than one that’s artificially bright!
How do I prevent my banana slices from turning brown in the cheesecake?
This is a common concern with banana desserts! The best way to prevent browning is to toss your banana slices in 1-2 teaspoons of lemon juice or pineapple juice before adding them to the pudding layer. The acid prevents oxidation that causes browning. For the decorative slices on top, wait to add those until just before serving, or brush them with a little diluted lemon juice. Another trick is to use bananas that are ripe but not overly so—they should be yellow with just a few brown spots. These won’t brown as quickly as very ripe bananas. Finally, keeping the cheesecake tightly covered in the refrigerator also helps slow the browning process.
Strawberry Banana Crunch Pudding Cheesecake
Equipment
- 9-inch springform pan
- Food processor
- Mixing bowls
- Hand Mixer or Stand Mixer
- Whisk
- Baking sheet
- Piping Bag with Star Tip
Ingredients
For the Cookie Crust
- vanilla wafer cookies
- graham crackers
- butter melted
- sugar
- salt
For the Banana Pudding Layer
- instant banana pudding mix
- milk
- vanilla extract
- fresh bananas
- vanilla wafer cookies for layering
For the Strawberry Cheesecake Layer
- 24 oz cream cheese room temperature
- sugar
- 3 eggs
- sour cream
- vanilla extract
- fresh strawberries pureed
- strawberry gelatin powder
- heavy cream
For the Strawberry Crunch Topping
- Golden Oreos
- freeze-dried strawberries
- butter melted
- strawberry gelatin powder
For the Whipped Cream Topping
- heavy cream
- powdered sugar
- vanilla extract
- fresh strawberries and banana slices for garnish
Instructions
- Preheat oven to 325°F. Make crust by pulsing cookies and crackers to crumbs, mix with butter, sugar, and salt. Press into a 9-inch springform pan and bake for 10 minutes. Cool.
- Whisk banana pudding mix with milk and vanilla. Set aside to thicken.
- Arrange vanilla wafers and sliced bananas on cooled crust. Spread banana pudding mixture over and layer more wafers. Chill.
- Reduce oven to 300°F. Puree strawberries. Beat cream cheese and sugar until smooth. Add eggs one at a time, then sour cream and vanilla.
- Mix strawberry puree with gelatin powder and fold into cheesecake batter. Stir in heavy cream.
- Pour cheesecake batter over banana pudding layer. Bake 70–80 minutes until set with slight jiggle. Cool in oven 1 hour, then chill overnight.
- Pulse Oreos and freeze-dried strawberries for crunch topping. Stir in gelatin powder and melted butter. Bake at 350°F for 5–7 minutes. Cool.
- Whip heavy cream with powdered sugar and vanilla to stiff peaks. Transfer to piping bag.
- Remove cheesecake from pan. Press crunch topping onto sides. Pipe whipped cream around top. Garnish with strawberries and bananas.