This post may contain affiliate links. As an Amazon Associate, we earn from qualifying purchases. We only recommend products we trust.
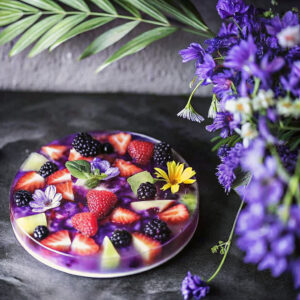
Take your dessert game to the next level with this absolutely stunning Agar Agar Fruit Jelly. This recipe uses a classic, reliable clear agar-agar base, which we divide, fill with vibrant tropical fruits, and layer with creamy coconut milk to create a beautiful, watercolor effect. The result is a delicious, refreshing fruit jelly that holds its shape perfectly and requires no further decorating (though a sprig of mint is a perfect finish!).
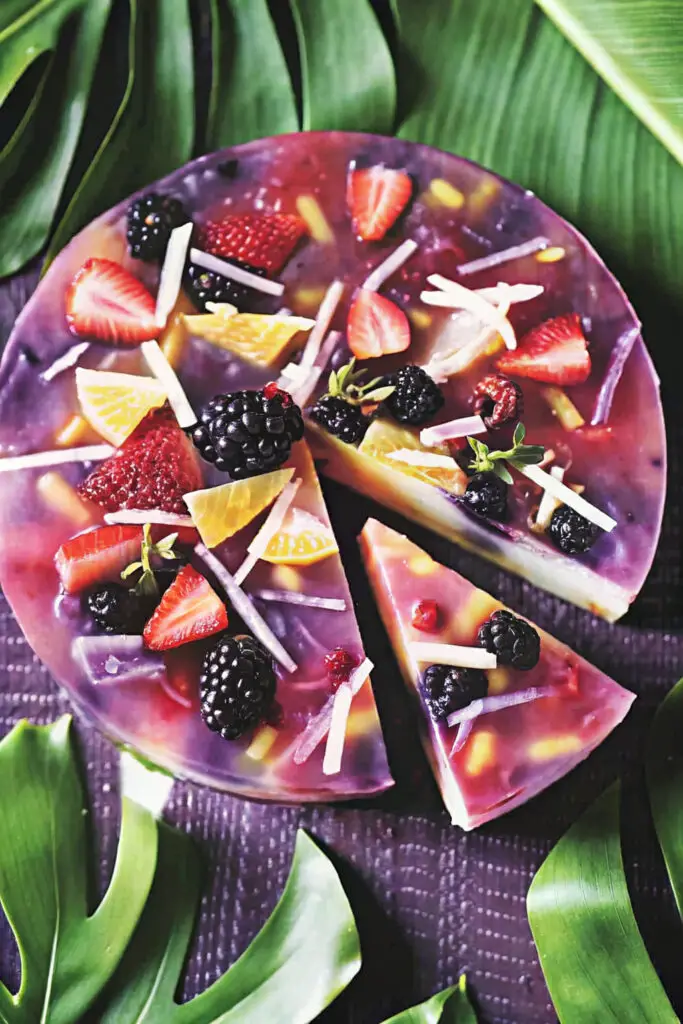
This technique is incredibly fun and surprisingly easy, giving you the best of both worlds: a great-tasting healthy dessert and a beautiful, festive visual. Unlike techniques that rely on gelatin, this plant-based agar-agar is set right in the mold, making these chilled treats an elegant and simple option for your loved ones.
Perfect for summer celebrations, backyard parties, or romantic dessert recipes for date night, these rainbow fruit jellies combine professional catering appearance with homemade love.
Table of Contents
Why You’ll Love This Agar Agar Jelly Recipe
Stunning Visual: The gentle mixing of the clear jelly, colorful fruit, and white coconut layers creates a unique, artful marbled effect in every bite.
No-Melt Guarantee: The agar-agar is formulated to remain firm at room temperature, essential for perfect outdoor party desserts.
Fun to Make: The process of arranging the fruit patterns and pouring the layers is a wonderful, meditative activity—ideal for healthy dessert bars for kids.
Classic Flavor: A simple, sweet coconut and tropical fruit base that everyone loves.
No Baking Required: Unlike traditional cakes, these are beautiful right out of the fridge with no complicated oven time.
Ingredients for Agar Agar Fruit Jelly
- 1 head-sized assortment of Fresh Fruit (Kiwi, Mango, Strawberries, Blueberries)
- 1 package (10g) Agar-Agar Powder
- 4 cups Water (divided)
- 1 cup Coconut Milk (full fat)
- ¾ cup Granulated Sugar
- 1 tsp Vanilla or Pandan Extract
- A pinch of Salt
Best Ingredients for Fruit Desserts
For the most vibrant results in your rainbow jelly creations, use high-quality agar-agar powder. Professional brands like Telephone Brand produce the most crystal-clear set without adding excess cloudiness to your dessert. Premium coconut milk or coconut water can be added for variation, and fresh tropical fruits elevate the flavor profile significantly.
Instructions (Step-by-Step): How to Make Fruit Jelly
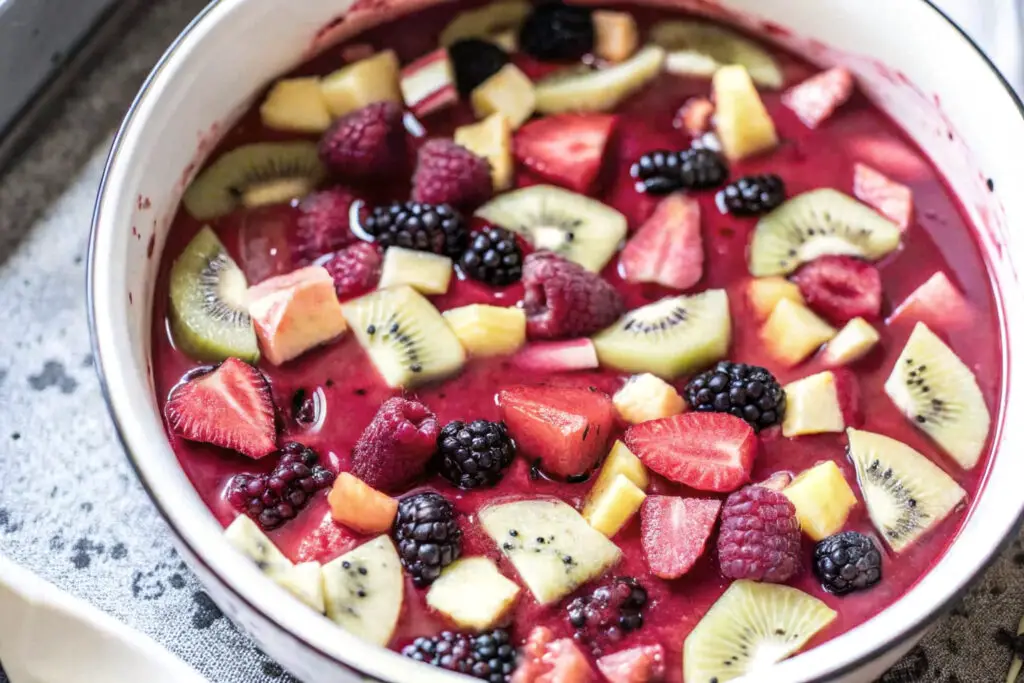
Step 1: Prep Fruit Base Wash and slice all your fruit into uniform, bite-sized pieces. Arrange the colorful fruit in a decorative pattern at the bottom of a bundt pan or individual silicone molds. Ensure the fruit is packed tightly so it doesn’t move when the liquid is added.
Step 2: Dissolve and Tint (Clear Layer) In a medium saucepan, whisk together 3 cups of water and half of the agar-agar powder. Bring to a boil over medium heat, stirring constantly for 2-3 minutes until the powder is fully dissolved. Gradually mix in half of the sugar until no grains remain. This will remain the clear base for the fruit suspension.
Step 3: Create Marbled Effect Slowly and gently pour the clear agar mixture over the fruit in the mold. Use a toothpick to move any bubbles to the edges—just enough until a bouquet of colors is visible. Do not pour too fast, or the fruit pattern will be ruined. This is the key technique for achieving stunning fruit jellies.
Step 4: Chill (The “Sticky” Step) Allow the clear layer to sit at room temperature for 10-15 minutes. It should be firm to the touch but still slightly tacky on top. This is essential for no-slip layers that stay attached when sliced.
Step 5: Prep Coconut Layer In a clean saucepan, combine the remaining water, coconut milk, remaining agar-agar, and sugar. Whisk and bring to a simmer. Stir until fully and evenly tinted white. This second pour provides the best of both worlds: a creamy flavor and a beautiful visual contrast.
Step 6: Final Pour (Recommended for Multi-Layers) Carefully pour the warm coconut mixture over the tacky clear layer. If you want more layers, repeat the process. This final addition is the best way to prevent the jelly from looking “flat” and guarantee perfect rainbow tiers.
Step 7: Set and Cool Place the mold in the refrigerator for at least 2 hours. Allow the jelly to rest in the fridge until fully firm. To unmold, gently pull the edges away from the sides and invert onto a plate. Slice into wedges to showcase the beautiful fruit cross-sections.
Storage and Expert Tips for Professional Jelly Decorating
Essential Tips:
Agar-Agar Powder is Required: Powdered agar is non-negotiable for this recipe. Gelatin will melt at room temperature, while agar stays firm and provides the vibrant “snap” needed for stunning fruit-filled desserts.
Do Not Overwork the Layers: When pouring the second layer (Step 6), do it as gently as possible. The goal is to see distinct clear and white sections, not a uniform cloudy mess. This creates the signature layered jelly effect.
Fruit Selection: Avoid using fresh pineapple, kiwi, or papaya in the clear layer if you are using gelatin, but with agar-agar, you can use any fruit! The more you vary the colors, the better the final visual will be.
Final Chill is Gold: Even if the jelly feels hard, the full 2-hour fridge time (Step 7) is the key hack for guaranteed clean-cut slices. This is one of the most important professional jelly decorating techniques.
Temperature Control: Use warm liquid for the second layer. If the liquid is boiling, it will melt the first layer; if it’s too cold, the layers won’t stick together.
Storage Instructions: Store the fruit jelly in an airtight container in the refrigerator for up to 3 days. For longer storage, keep in the coldest part of the fridge. Do not freeze, as the fruit will become mushy and the agar will release water.

Creative Variations for Healthy Fruit Desserts
Flower Petal Finish Once the clear layer is poured, tuck in edible flowers (like pansies) for definition. This creates an elegant “garden” effect perfect for spring tea parties.
Sparkling Soda Elegance Instead of water for the clear layer, use a clear lemon-lime soda for a shimmering finish perfect for New Year’s or upscale celebrations.
Coconut Cream Variation Add ½ cup of shredded young coconut along with the coconut milk for a more complex flavor profile that mimics high-end Thai dessert creations.
Coffee-Dipped Jelly Layer a coffee-flavored agar base at the bottom of the mold. Immediately sprinkle with cocoa powder for texture and color contrast once unmolded.
Pandan Green Infusion Add a drop of pandan extract to the coconut layer. This adds a nutty richness while showcasing the beautiful green and white pattern underneath.
Best Molds and Jelly Supplies for Fruit Desserts
Transform your easy jelly creations into professional-quality treats with the right decorating supplies. Here’s what works best:
Top Choice Ingredients:
- Basil Seeds: For a “polka dot” theme that adds nostalgic charm
- Fresh Lychees: Whole fruits that create elegant hidden texture
- Fruit Juice: Swap water for apple or grape juice for color dimension
- Whole Vanilla Beans: For upscale, speckled presentation
- Edible Silver Leaf: For sparkling edges on special occasions
Essential Decorating Tools:
- Bundt Pan: Invest in a silicone one for easy removal of variety
- Thickness Slicer: Ensures uniform wedges for even presentation
- Precision Droppers: Perfect for placing delicate fruit pieces without distortion
- Offset Spatula: Essential for checking layer tackiness without damage
These supplies are available at specialty kitchen stores or through online retailers. Using professional jelly tools elevates your results significantly.
Serving Suggestions for Healthy Party Desserts
Festive Occasions: Ideal for Summer Solstice, lunar new year, baby showers, or galentine’s day celebrations. These fruit jelly ideas work beautifully as part of a larger dessert spread.
Perfect Pairings:
- Iced Jasmine Tea: The floral notes pair perfectly with creamy coconut jellies
- Sparkling Cider: Balances the sugar with bright, bubbly notes
- Fresh Tropical Fruit: For a full island experience, serve alongside sliced mango
- Limeade: Kid-friendly pairing for summer healthy treats
Dessert Table Presentation: Arrange jellies on a white ceramic platter with varying heights. Mix with other colorful desserts like fruit skewers, coconut macaroons, and sorbet for visual impact.
Homemade Gift Packaging Ideas for Gifting
Transform your homemade healthy recipes into thoughtful gifts with creative packaging:
Individual Packaging:
- Small clear bento boxes tied with colorful ribbon
- Individual glass jars lined with parchment paper (available at craft stores)
- Compostable leaf bowls filled with 2-3 slices
- Decorated paper sleeves for single-serving cubes
Bulk Gifting:
- Decorative baskets filled with a mold and a packet of agar powder
- “Tropical Escape” gift boxes with custom labels
- Stacked jellies wrapped in clear wrap and finished with a bow
- Dessert towers arranged on decorative platters wrapped in cellophane
Add personalized tags with messages like “A Refreshing Treat” or “Sweet Summer” to complete the presentation. These packaging ideas work beautifully for neighbors, coworkers, or anyone special.
Agar Agar Fruit Jelly
Equipment
- Large saucepan
- bundt pan or silicone molds
- Whisk
- Measuring Cups
Ingredients
- 10 g agar-agar powder
- 4 cups water
- 1 cup coconut milk
- 0.75 cup sugar
- 2 cups mixed fresh fruit (mango, kiwi, berries)
Instructions
- Arrange sliced fruit in the bottom of a bundt pan or silicone mold in a decorative pattern.
- In a saucepan, bring 3 cups of water to a boil. Whisk in 5 g agar-agar powder and half of the sugar until completely dissolved.
- Carefully pour the clear agar mixture over the arranged fruit. Allow it to sit for about 15 minutes until the surface becomes slightly tacky.
- In a clean saucepan, bring the remaining 1 cup water to a boil. Add the remaining 5 g agar-agar powder, coconut milk, and the remaining sugar. Whisk until smooth and dissolved.
- Allow the coconut mixture to cool slightly, then gently pour it over the first fruit layer.
- Refrigerate the jelly for about 2 hours or until fully set and firm.
- Carefully invert the mold onto a serving plate, slice into portions, and serve chilled.
Notes
Frequently Asked Questions About Agar Fruit Jelly
Q: Can I use canned fruit? A: Yes. You can use canned peaches or lychees. Drain them well so they don’t bleed syrup into the clear jelly. This makes them perfect as make ahead healthy treats.
Q: How do I ensure my layers don’t separate? A: To guarantee a no-slip result: 1) Score the first layer with a fork. 2) Pour the second layer while the first is tacky. 3) Use warm (not boiling) liquid. These are the most reliable techniques for perfect layered jelly.
Q: Why does the recipe use agar-agar instead of gelatin? A: Agar-agar is plant-based and sets much firmer. It doesn’t require constant refrigeration to stay solid, which is essential for vibrant fruit jelly creations at parties.
Q: How long will the fruit jelly stay fresh? A: Store the jelly in an airtight container in the fridge for up to 3 days. It is best eaten fresh as the fruit can release water, making them ideal for quick snack needs when unexpected guests arise.
Q: Can I make these without a fancy mold? A: Absolutely! You can use a simple square glass dish and cut the jelly into cubes. The marbled effect looks stunning regardless of shape.
Q: Are these jellies good for kids? A: Yes! The process of seeing the fruit “floating” inside is fun and forgiving, making these perfect for healthy dessert bars for school activities.
Q: What’s the best way to transport these without them melting? A: Use sturdy containers with ice packs. Even though agar is stable, the fruit stays fresher when cold. For gift-giving, individual glass jars provide protection.
Q: Can I add chocolate to the coconut layer? A: While possible, chocolate can make the layer heavy and oily. For best results, keep the base plain or try dipping the finished slices in chocolate instead. This preserves the beautiful fruit pattern.
Q: How do I prevent the jelly from being too hard? A: The key is the water ratio. Follow the 10g to 4 cups rule—stop as soon as the powder is dissolved. Over-boiling the agar is a common mistake that creates a rubbery texture.
Q: Are these suitable as no-cook healthy treats? A: No, agar must be boiled to activate. However, it’s so easy to make that it’s just as convenient as many no-bake desserts. The total active time is under 15 minutes.
Why These Are the Best Agar Agar Fruit Jelly Recipe
If you’re searching for easy fruit desserts that look professional without requiring advanced pastry skills, this agar agar fruit jelly is your answer. The built-in fruit decoration means no frosting skills required, no piping frustration, and no hours spent decorating.
The plant-based formula ensures every slice looks bakery-perfect, while the layering technique creates unique, one-of-a-kind patterns that make each jelly special. Whether you’re preping for a summer party, preparing healthy lunchbox treats, or creating homemade treats for school, this recipe delivers consistent, beautiful results.
The tropical coconut flavor appeals to all ages, and the eye-catching rainbow colors make these jellies Instagram-worthy without any additional effort. These jelly cubes or classic bundt shapes work equally well for any celebration style.
More Healthy Dessert Ideas and Fruit Treats
Once you’ve mastered this fruit jelly, explore other festive dessert bars and seasonal treats:
- Pandan Coconut Jelly: Use this same coconut base with traditional pandan leaves
- Coffee Milk Jelly: Use this dough base with traditional espresso flavors
- Watermelon Jelly: Incorporate fresh melon juice for natural red color and fruit flavor
- Mango Cream Jellies: Another stunning yellow and white dessert option for summer celebrations
- Fruit Cocktail Kanten: A rustic version of this recipe perfect for family gatherings
The techniques you’ve learned here—proper agar boiling, fruit layering, and the tacky-touch method—translate perfectly to countless other jelly recipes throughout the year.