This post may contain affiliate links. As an Amazon Associate, we earn from qualifying purchases. We only recommend products we trust.
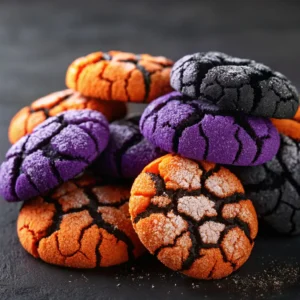
Get ready to bake the most dramatic and delicious cookie of the season! These Halloween Crinkle Cookies are a stunning and festive treat, perfect for any spooky celebration. This recipe creates a rich, fudgy, brownie-like cookie with a beautiful, crackled surface that is perfect for showcasing vibrant Halloween colors like orange, purple, or even a ghoulish black. They are surprisingly easy to make and are a guaranteed showstopper on any party dessert table.

These eye-catching cookies have become the gold standard for Halloween baking, combining theatrical presentation with irresistible flavor. Perfect for trick-or-treat parties, school celebrations, costume party dessert tables, or simply indulging in seasonal treats at home. The dramatic crackled appearance looks incredibly complex, but the technique is actually beginner-friendly and foolproof when you follow the simple steps.
Table of Contents
Why This is the Ultimate Halloween Crinkle Cookies
When it comes to festive and fun baking, these cookies are a must-make for anyone who wants to impress with minimal effort.
Incredibly Striking Appearance: The contrast between the dark, colorful cookie and the bright white powdered sugar coating creates a beautiful “crinkle” effect that is very eye-catching. These cookies are naturally Instagram-worthy and photograph beautifully.
Rich and Fudgy Texture: These aren’t a crispy cookie; they have a wonderfully soft, dense, and fudgy center, almost like a brownie. The texture is what sets them apart from ordinary cookies and keeps people coming back for more.
Super Easy to Make: This is a very straightforward cookie recipe. The chilling step is essential, but the hands-on time is minimal. Even novice bakers can achieve professional-looking results.
Perfect for Parties: They are a unique and delicious cookie that is easy to make in large batches, and their festive colors make them perfect for a Halloween party. They transport well and hold up beautifully on dessert tables.
Customizable Colors: The ability to create different colored batches means you can match any party theme or create a rainbow assortment for visual impact.
Kid-Friendly Activity: Children love rolling the dough balls in powdered sugar, making this a great family baking project.
Make-Ahead Friendly: The dough can be prepared days in advance, making party prep stress-free.
Allergen Considerations: Easily adaptable for various dietary needs with simple substitutions.
Crowd-Pleasing Flavor: The chocolate base appeals to virtually everyone, making these a safe bet for mixed gatherings.
Your Simple Ingredient Checklist
This recipe uses simple pantry staples to create a spectacular cookie that looks like it came from a professional bakery.
The Ingredient Lineup:
- 1 cup of all-purpose flour
- ½ cup of unsweetened cocoa powder
- 1 tsp of baking powder
- ¼ tsp of salt
- 1 cup of granulated sugar
- ¼ cup of vegetable oil
- 2 large eggs
- 1 tsp of pure vanilla extract
- Gel food coloring (orange, purple, or black)
- ½ cup of powdered sugar (for rolling)
Ingredient Deep Dive:
All-Purpose Flour: Provides the structure for these cookies without making them cakey. The moderate protein content creates just the right texture.
Unsweetened Cocoa Powder: Creates the deep, rich chocolate base and dark color that makes the crackles so dramatic. Dutch-process cocoa creates a darker color, while natural cocoa powder offers slightly more acidity.
Baking Powder: The leavening agent that helps create the signature cracks as the cookies rise and spread in the oven.
Vegetable Oil: Unlike butter, oil stays liquid at room temperature, contributing to the soft, fudgy texture. It also helps create a more dramatic crackle pattern.
Granulated Sugar: Provides sweetness and contributes to the chewy texture. Sugar also helps with spreading and browning.
Eggs: Bind the ingredients together and contribute to the fudgy texture. They also add richness and help with leavening.
Gel Food Coloring: Concentrated colorants that create vibrant hues without adding excess liquid to the dough. They’re essential for achieving those bold Halloween colors.
Powdered Sugar: The coating that creates the iconic white crackled appearance. As the cookies bake and crack, the contrast becomes stunning.

Color Theory and Creative Options
Transform your cookies into edible art with strategic color choices:
Classic Halloween Colors:
- Vibrant Orange: Traditional pumpkin color, cheerful and festive
- Deep Purple: Mystical and elegant, perfect for witchy themes
- Midnight Black: Dramatic and sophisticated, activated charcoal optional
- Lime Green: Reminiscent of witches’ brew and monsters
Color Combinations:
- Orange and Purple Swirl: Marble effect before chilling
- Rainbow Batch: Multiple colors for variety
- Ombre Effect: Different shades of the same color
- Two-Tone: Half-dipped or dual-colored portions
Special Effects:
- Natural Black: Add 1 tablespoon activated charcoal powder
- Metallic Sheen: Dust with edible gold or silver before baking
- Speckled: Mix two colors for a speckled stone effect
- Pastel Version: Use less food coloring for softer hues
Step-by-Step Instructions
The secret to the perfect crinkle is the chilling time, so don’t skip it! Follow these detailed steps for foolproof results.
Part 1: Make and Chill the Dough
Combine Dry Ingredients: In a medium bowl, whisk together the all-purpose flour, cocoa powder, baking powder, and salt. Whisking ensures even distribution and removes any lumps from the cocoa powder.
Combine Wet Ingredients: In a separate large bowl, beat together the granulated sugar, vegetable oil, eggs, and vanilla extract until the mixture is smooth. The mixture should be glossy and well-incorporated.
Add the Color: Add a few drops of your chosen gel food coloring to the wet mixture and mix until you reach a vibrant, desired color. Start with 2-3 drops and add more gradually until you achieve your desired intensity.
Combine and Chill: Gradually fold the dry ingredients into the wet ingredients with a spatula until just combined. The dough will be very soft and sticky – this is normal! Cover the bowl with plastic wrap and refrigerate the dough for at least 1 hour, or until it is firm enough to handle. For best results, chill for 2-3 hours or overnight.
Part 2: Roll and Bake
Preheat and Prep: Preheat your oven to 350°F (175°C). Line two large baking sheets with parchment paper or silicone baking mats. Place the powdered sugar in a shallow bowl.
Scoop and Roll: Once the dough is chilled and firm, use a tablespoon or a small cookie scoop to portion out the dough. Roll each portion into a 1-inch ball. Work quickly so the dough doesn’t warm up too much.
Coat in Sugar: Roll each dough ball generously in the powdered sugar until it is completely coated. Don’t be shy – a thick coating creates the most dramatic crackles.
Bake: Place the coated dough balls about 2 inches apart on your prepared baking sheets. Bake for 10-12 minutes. The cookies are done when the surfaces have spread and cracked, but the centers are still slightly soft. They should look set but not hard.
Cool: Let the cookies cool on the baking sheet for at least 5 minutes before transferring them to a wire rack to cool completely. The crinkles will become more defined as they cool, and the texture will set perfectly.
Professional Baking Tips
Elevate your crinkle cookies from good to spectacular:
Temperature Control:
- Proper Chilling: Colder dough creates better crackles; chill minimum 1 hour
- Room Temperature Eggs: Incorporate better into mixture
- Cool Baking Sheets: Use cool sheets between batches for consistent results
Texture Perfection:
- Don’t Overbake: Slightly underbaked centers stay fudgy
- Uniform Size: Use cookie scoop for consistent baking
- Spacing Matters: Allow 2 inches between cookies for proper spreading
Crackle Maximization:
- Generous Sugar Coating: More powdered sugar equals more dramatic cracks
- Proper Chilling: Cold dough cracks better than warm
- Quick Work: Roll and bake without letting dough warm excessively
Storage and Make-Ahead Strategies
Keep your cookies fresh and plan ahead for stress-free entertaining:
Make-Ahead Options:
- Dough Storage: Refrigerate up to 3 days before baking
- Freeze Dough Balls: Pre-formed and coated, freeze up to 3 months
- Baked Cookie Storage: Store finished cookies in airtight containers
- Party Prep: Bake 1-2 days ahead for optimal freshness
Storage Guidelines:
- Room Temperature: 5-7 days in airtight container
- Layered Storage: Separate layers with parchment to prevent sticking
- Humidity Control: Store with rice packet to prevent excess moisture
- Frozen Baked: Up to 3 months, thaw at room temperature
Transportation Tips:
- Sturdy Containers: Use rigid containers to protect delicate crackles
- Single Layer: Avoid stacking to preserve appearance
- Parchment Layers: Separate layers if stacking is necessary
- Last-Minute Assembly: Dust with extra powdered sugar before serving
Serving Suggestions and Party Ideas
Make your Halloween cookies the star of any celebration:
Presentation Concepts:
- Tiered Display: Use cake stands at varying heights
- Color Coordination: Arrange by color for visual impact
- Themed Platters: Serve on Halloween-themed dishes
- Individual Wrapping: Cellophane bags tied with orange ribbon
Pairing Suggestions:
- Hot Chocolate: Classic combination, especially for kids
- Cold Milk: Traditional cookie accompaniment
- Coffee: Adult-friendly pairing for evening parties
- Spiced Cider: Seasonal beverage that complements chocolate
Party Integration:
- Cookie Decorating Station: Let guests coat their own cookies
- Gift Bags: Party favors that guests can take home
- Dessert Buffet: Coordinate with other Halloween treats
- Photo Opportunity: Create Instagram-worthy display
Dietary Modifications and Substitutions
Adapt the recipe for various dietary needs:
Gluten-Free Version:
- Replace all-purpose flour with 1:1 gluten-free flour blend
- Ensure baking powder is gluten-free certified
- Texture may be slightly different but still delicious
Dairy-Free Adaptation:
- Recipe is naturally dairy-free as written
- Ensure gel food coloring is dairy-free
- Perfect for lactose-intolerant guests
Egg-Free Option:
- Use 2 flax eggs (2 tablespoons ground flaxseed + 6 tablespoons water)
- Let mixture sit 5 minutes before using
- Texture will be slightly less fudgy
Reduced Sugar:
- Decrease granulated sugar to ¾ cup for less sweetness
- Maintain powdered sugar coating for appearance
- Flavor remains rich and satisfying

Frequently Asked Questions
1. Why is it so important to chill the dough for crinkle cookies? Chilling the dough is the most crucial step for a successful crinkle cookie. This dough is very soft and sticky when first mixed. Chilling it solidifies the fat (the oil), which prevents the cookies from spreading too much and too quickly in the oven. This slow spread is what allows the signature cracks and crinkles to form on the surface. Without proper chilling, you’ll end up with flat cookies without the dramatic crackle effect.
2. Can I use liquid food coloring instead of gel? It is highly recommended to use gel food coloring for this recipe. Gel colors are much more concentrated, so you only need a few drops to get a deep, vibrant color. Liquid food coloring is less intense and adding too much of it can alter the consistency of your cookie dough, potentially making it too wet. This extra moisture can prevent proper crackle formation and affect texture.
3. Can I make the dough ahead of time? Yes, this is a great recipe for making ahead! You can prepare the cookie dough and store it, well-covered, in the refrigerator for up to 3 days. When you’re ready to bake, just scoop, roll in powdered sugar, and bake as directed. The dough actually benefits from longer chilling time, developing even better flavor and texture.
4. How do I store the baked cookies? Store the completely cooled crinkle cookies in an airtight container at room temperature. They will stay soft and fudgy for up to 5-7 days. For best results, place parchment paper between layers to prevent the powdered sugar coating from transferring. If they dry out slightly, place a slice of bread in the container for a few hours to restore moisture.
5. Why didn’t my cookies crackle properly? Several factors affect crackling: insufficient chilling time, dough too warm when baking, not enough powdered sugar coating, or overbaking. Ensure dough is thoroughly chilled, work quickly when rolling, coat generously in powdered sugar, and remove from oven when centers are still slightly soft.
6. Can I make different colors in one batch? Absolutely! Divide the dough after combining wet and dry ingredients, then add different gel colors to each portion. Chill all portions before baking. This creates a beautiful rainbow assortment perfect for parties.
7. My cookies spread too much. What happened? Over-spreading usually indicates insufficient chilling time or too-warm dough. Make sure dough is very firm before scooping, work quickly during the rolling process, and consider chilling formed balls briefly before baking if your kitchen is warm.
8. Can I add mix-ins like chocolate chips? While you can add mix-ins, they may interfere with the crackle pattern. If desired, press a few chocolate chips onto the tops after coating in powdered sugar. Mini chips work better than standard size.
9. How do I achieve a deeper black color? For true black cookies, use black gel food coloring liberally (more than you think necessary) or add 1 tablespoon of activated charcoal powder to the dry ingredients for a natural black color without affecting taste.
10. Can I make these cookies larger or smaller? Yes! Adjust baking time accordingly: smaller cookies (½-inch balls) bake for 8-10 minutes, while larger cookies (1½-inch balls) need 12-14 minutes. Watch for the characteristic cracks to know when they’re done.
Troubleshooting Common Issues
Problem: Cookies didn’t crack at all
Solution: Dough wasn’t chilled long enough, or powdered sugar coating was too thin. Chill dough thoroughly and coat generously.
Problem: Cracks disappeared during baking
Solution: Cookies were overbaked. Remove when centers are still soft and cracks are just forming – they’ll continue setting as they cool.
Problem: Cookies are too cake-like
Solution: May have been overbaked or dough wasn’t sticky enough initially. Reduce baking time and ensure proper measurements.
Problem: Powdered sugar melted into cookies
Solution: Cookies were too hot when coated, or coating was applied too heavily right before baking. Roll room-temperature dough balls only.
Problem: Colors aren’t vibrant
Solution: Use gel food coloring instead of liquid, and add more drops than you initially think necessary. Colors lighten slightly when baked.
Creative Variations and Seasonal Adaptations
Transform your basic recipe for year-round enjoyment:
Holiday Versions:
- Christmas: Red and green colors with peppermint extract
- Valentine’s Day: Pink and red with raspberry extract
- Easter: Pastel colors with lemon or orange extract
- Fourth of July: Red, white, and blue patriotic cookies
Flavor Twists:
- Mocha: Add 1 teaspoon instant espresso powder
- Orange Chocolate: Add 1 teaspoon orange extract
- Mint Chocolate: Add ½ teaspoon peppermint extract
- Spiced: Include ½ teaspoon cinnamon or chai spice
Special Occasion Ideas:
Gender Reveal: Pink or blue for surprise parties.
Birthday Parties: Use birthday person’s favorite colors
Sports Teams: Team colors for game day treats
School Colors: Perfect for team spirit events
Halloween Crinkle Cookies
Equipment
- Mixing bowls
- Whisk
- Electric mixer or spatula
- Plastic wrap
- Baking Sheets
- Parchment paper
- Wire Rack
Ingredients
- 1 cup all-purpose flour
- 1/2 cup unsweetened cocoa powder
- 1 tsp baking powder
- 1/4 tsp salt
- 1 cup granulated sugar
- 1/4 cup vegetable oil
- 2 large eggs
- 1 tsp vanilla extract
- Gel food coloring (orange, purple, or black)
- 1/2 cup powdered sugar
Instructions
- In a medium bowl, whisk together the flour, cocoa powder, baking powder, and salt.
- In a separate large bowl, beat the sugar, vegetable oil, eggs, and vanilla until smooth. Stir in gel food coloring until vibrant.
- Gradually fold in the dry ingredients until just combined. Dough will be sticky. Cover and refrigerate for at least 1 hour.
- Preheat oven to 350°F (175°C). Line baking sheets with parchment paper. Place powdered sugar in a shallow bowl.
- Roll chilled dough into 1-inch balls. Coat generously in powdered sugar.
- Place on prepared baking sheets, 2 inches apart. Bake for 10-12 minutes, until crackled but still soft in the center.
- Cool on the baking sheet for 5 minutes before transferring to a wire rack. Enjoy!
Notes
Conclusion
These Halloween Crinkle Cookies represent the perfect intersection of stunning visual appeal and delicious flavor. They prove that impressive baking doesn’t have to be complicated – sometimes the simplest techniques create the most dramatic results. The combination of rich, fudgy chocolate texture with that signature crackled appearance makes these cookies unforgettable.
Whether you’re an experienced baker or just starting your baking journey, these cookies offer a foolproof path to creating something truly special. The vibrant colors, theatrical presentation, and brownie-like texture make them stand out on any dessert table while the straightforward technique ensures success every time.
From Halloween parties to year-round celebrations, these versatile cookies adapt to any occasion with simple color changes. They’re perfect for making with children, impressing party guests, or simply treating yourself to something special during the spooky season.
So embrace the magic of fall baking, choose your favorite Halloween colors, and prepare to create cookies that look as amazing as they taste. Your guests won’t believe these professional-looking treats came from your home kitchen, and you’ll love how simple they are to make. Happy baking, and may your Halloween be filled with delicious, crackled perfection!