Oh my goodness, I’m almost hesitant to share this recipe because once you make these Caramel Pretzel Crack Bars, your friends and family will never stop begging for them! They’ve earned their name honestly – one bite of these sweet and salty treats and you’re completely hooked. The first time I brought these to my neighborhood potluck, they disappeared in minutes, and my phone was blowing up with recipe requests before I even got home! Trust me, there’s something absolutely magical about the combination of buttery crackers, crunchy pretzels, gooey caramel, and rich chocolate that makes these bars utterly irresistible. They’re dangerously easy to make too – no fancy equipment needed, just a few simple ingredients and about 30 minutes of your time for a treat that’ll make you famous at every gathering!
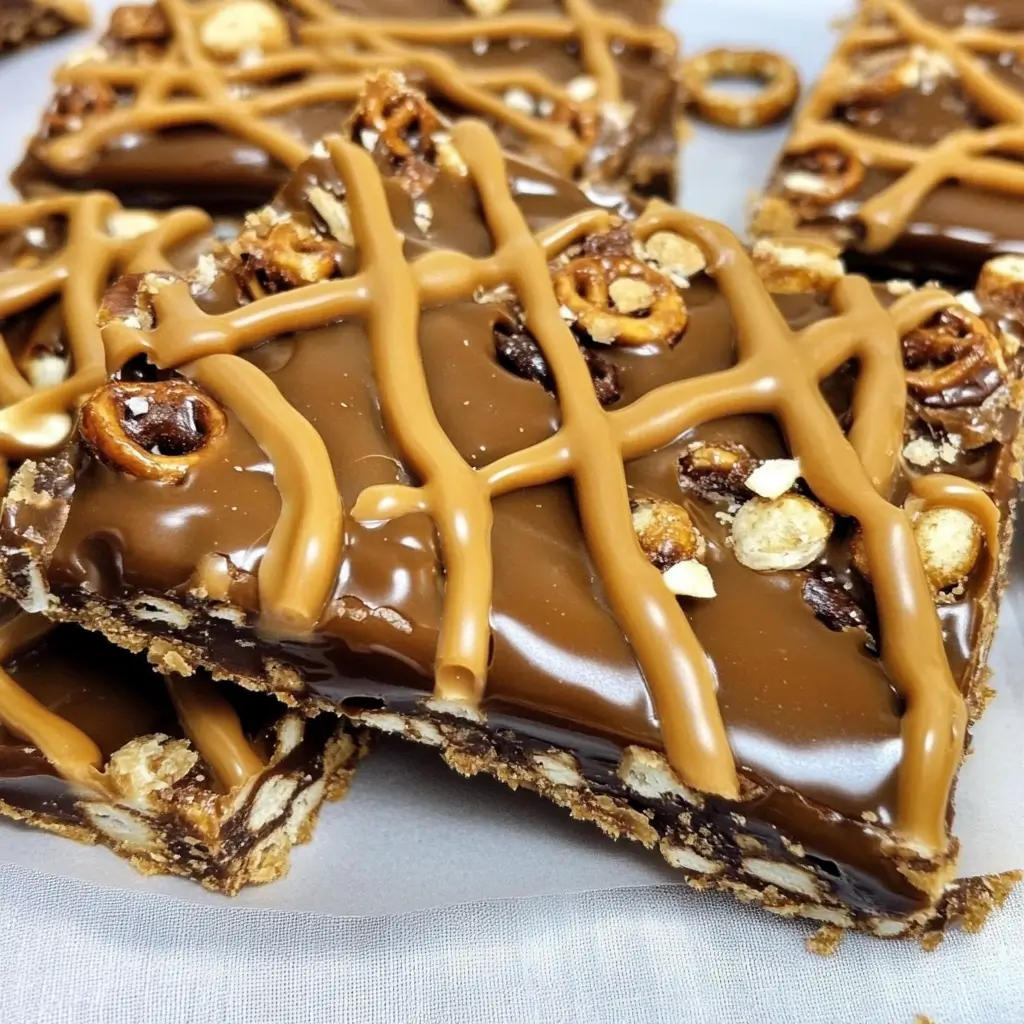
Table of Contents
Why You’ll Love This Recipe
- The sweet-salty combination creates an addictively delicious flavor profile that everyone loves.
- They’re incredibly easy to make, with no mixer or special equipment required.
- These bars can be made ahead of time, perfect for parties or holiday cookie trays.
- They’re endlessly customizable with different toppings and mix-ins.
Ingredients
For the Base:
- Saltine crackers – creates the perfect crispy, buttery foundation for our bars.
- Pretzels – adds that irresistible salty crunch that balances the sweetness.
- Butter – real butter is essential for that rich caramel flavor.
- Brown sugar – gives our caramel that deep, molasses-tinged sweetness.
- Vanilla extract – rounds out the caramel flavor with warm, aromatic notes.
For the Topping:
- Semi-sweet chocolate chips – melts into a perfect layer of chocolate goodness.
- White chocolate chips – creates beautiful swirls and adds another dimension of sweetness.
- Sea salt flakes – that finishing touch that makes the flavors pop.
- Toffee bits – for extra caramel flavor and delightful little crunchy surprises.
The full ingredient list with measurements will be available in the recipe card below.
How to Make Caramel Pretzel Crack Bars.
- Prep your pan: Preheat your oven to 350°F and line a 9×13 inch baking pan with parchment paper, allowing some overhang on the sides for easy removal later. Spray lightly with non-stick cooking spray.
- Create the cracker layer: Arrange saltine crackers in a single layer, salt side down, covering the entire bottom of the pan. Don’t worry if you need to break some to fit – no one will notice in the finished bars!
- Add the pretzel layer: Coarsely crush your pretzels (a zip-top bag and rolling pin works perfectly) and sprinkle them evenly over the crackers. Some pretzel pieces should be small, some larger – that variety creates great texture!
- Make the caramel magic: In a medium saucepan, combine butter and brown sugar over medium heat. Bring to a gentle boil and let it bubble for exactly 3 minutes without stirring – timing is crucial here! Remove from heat and stir in the vanilla extract, being careful as it might bubble up.
- Pour and bake: Immediately pour the hot caramel evenly over the cracker and pretzel layers, trying to cover as much as possible. Don’t worry if it’s not perfect – it will spread as it bakes! Pop the pan into the oven for 5-7 minutes, just until the caramel is bubbly all over.
- Add the chocolate layers: Remove from oven and immediately sprinkle the semi-sweet chocolate chips evenly over the hot caramel. Let them sit for 2-3 minutes to get melty, then use an offset spatula or the back of a spoon to gently spread the chocolate into a smooth layer.
- Create the swirl effect: Sprinkle the white chocolate chips over the melted chocolate layer. Wait about 1 minute, then use a toothpick or the tip of a knife to swirl them slightly into the chocolate layer, creating a marbled effect.
- Add the finishing touches: While everything is still warm, sprinkle the toffee bits and sea salt flakes over the top. The warmth will help them stick to the chocolate.
- Chill to set: Refrigerate the bars for at least 2 hours until completely set. This makes them much easier to cut into clean, sharp-edged bars.
- Cut and serve: Once set, lift the entire slab out using the parchment paper overhang. Cut into bars or squares using a sharp knife (warming the knife under hot water helps create clean cuts!).
Pro Tips for Making the Recipe
The caramel timing is crucial! Set a timer for exactly 3 minutes once it starts bubbling to get that perfect chewy-but-not-hard texture.
For the cleanest cuts, chill the bars completely, then use a large sharp knife dipped in hot water and dried between cuts.
Don’t skip the parchment paper lining – it makes removal from the pan so much easier and prevents sticking.
If you’re having trouble spreading the chocolate without disturbing the layers beneath, let the chips sit a little longer on the hot caramel before spreading, or use a hair dryer on low heat to gently warm them.
How to Serve
These bars make a gorgeous addition to any dessert table or cookie platter – the contrast of the dark chocolate swirled with white chocolate and the sprinkle of toffee bits is just beautiful!
For a simple but elegant dessert, serve a single bar on a small plate with a scoop of vanilla ice cream and a drizzle of extra caramel sauce.
Package them in cellophane bags tied with pretty ribbon for a thoughtful homemade gift during the holidays – everyone will be thrilled to receive them!
These bars are the perfect companion to afternoon coffee or tea – the sweet-salty combination pairs beautifully with a slightly bitter coffee or a rich Earl Grey.
Make Ahead and Storage
Make ahead options: These bars actually benefit from being made ahead! They can be prepared up to 3 days in advance and kept refrigerated until your event.
Counter storage: In cooler weather, these bars can be stored in an airtight container at room temperature for 3-4 days. Layer them with parchment paper to prevent sticking.
Refrigerator: For longer storage or during warmer months, keep them in the refrigerator for up to a week. The cooler temperature also gives them a delightful chewiness!
Freezer: These freeze beautifully! Place in a single layer on a baking sheet until frozen solid, then transfer to a freezer container with parchment between layers. They’ll keep for up to 3 months. Thaw in the refrigerator or at room temperature for about 30 minutes before serving.
FAQs
Can I use graham crackers instead of saltines?
Absolutely! Graham crackers make a wonderful substitute that creates a slightly sweeter base. You’ll follow the exact same process, arranging them in a single layer on the bottom of your pan. The flavor profile will shift a bit more to the sweet side rather than sweet-salty, but it’s equally delicious in its own way! Some people even like to use Ritz crackers for a buttery base, or chocolate graham crackers for an extra chocolate punch. Feel free to experiment with your favorite crackers!
My caramel hardened too much. What did I do wrong?
The most common reason for overly hard caramel is cooking it too long or at too high a temperature. Remember to set a timer for exactly 3 minutes once the butter-sugar mixture comes to a boil, and keep the heat at medium (not high). Another tip is to make sure your baking pan is ready before starting the caramel, as even an extra minute of cooking while you’re preparing other elements can affect the texture. If you live at high altitude, you might need to reduce the cooking time by 30 seconds as liquids boil at lower temperatures at altitude.
Can I add other toppings to these bars?
These bars are incredibly versatile! Some delicious additions include chopped nuts (pecans, peanuts, or almonds work beautifully), mini M&Ms, crushed Oreos, or even a drizzle of peanut butter melted with a little coconut oil for easier spreading. During the holidays, crushed candy canes or festive sprinkles make these bars extra special. Just be mindful not to overload the top or the bars may have trouble setting properly. I recommend choosing 2-3 toppings at most for the best balance of flavors and textures.
How do I prevent the chocolate layer from cracking when I cut the bars?
This is a common challenge with layered bars! The best trick is to let the bars come to room temperature for about 10-15 minutes before cutting if they’ve been fully chilled in the refrigerator. The slightly softened chocolate will cut more cleanly. Always use a very sharp knife, and wipe it clean between cuts. Some bakers even run their knife under hot water, then dry it quickly before each cut. If you’re serving these at a party where presentation is important, you can also score the chocolate layer while it’s just barely set (about 30 minutes after adding the chocolate) and then complete the cuts after full chilling.

Caramel Pretzel Crack Bars
Equipment
- 9×13 Baking Pan
- Parchment paper
- Saucepan
- Offset Spatula or Spoon
- Knife
- Rolling Pin or Zip-Top Bag
Ingredients
For the Base
- saltine crackers enough to cover pan in single layer
- pretzels coarsely crushed
- 1 cup unsalted butter
- 1 cup brown sugar
- 1 teaspoon vanilla extract
For the Topping
- 1 1/2 cups semi-sweet chocolate chips
- 1/2 cup white chocolate chips
- 1/3 cup toffee bits
- sea salt flakes
Instructions
- Preheat oven to 350°F. Line a 9×13 pan with parchment paper and spray lightly with nonstick spray.
- Arrange saltines in a single layer, salt side down, covering the bottom of the pan.
- Sprinkle crushed pretzels evenly over the crackers.
- In a saucepan, combine butter and brown sugar over medium heat. Bring to a boil and cook for exactly 3 minutes. Remove from heat and stir in vanilla.
- Immediately pour caramel over the cracker and pretzel base. Bake for 5–7 minutes, until bubbly.
- Remove from oven and sprinkle chocolate chips over hot caramel. Let sit 2–3 minutes, then spread evenly.
- Add white chocolate chips and swirl gently into the melted chocolate using a toothpick or knife.
- Sprinkle toffee bits and sea salt flakes over top while still warm.
- Chill in refrigerator at least 2 hours until firm. Lift from pan and cut into bars.