This post may contain affiliate links. As an Amazon Associate, we earn from qualifying purchases. We only recommend products we trust.
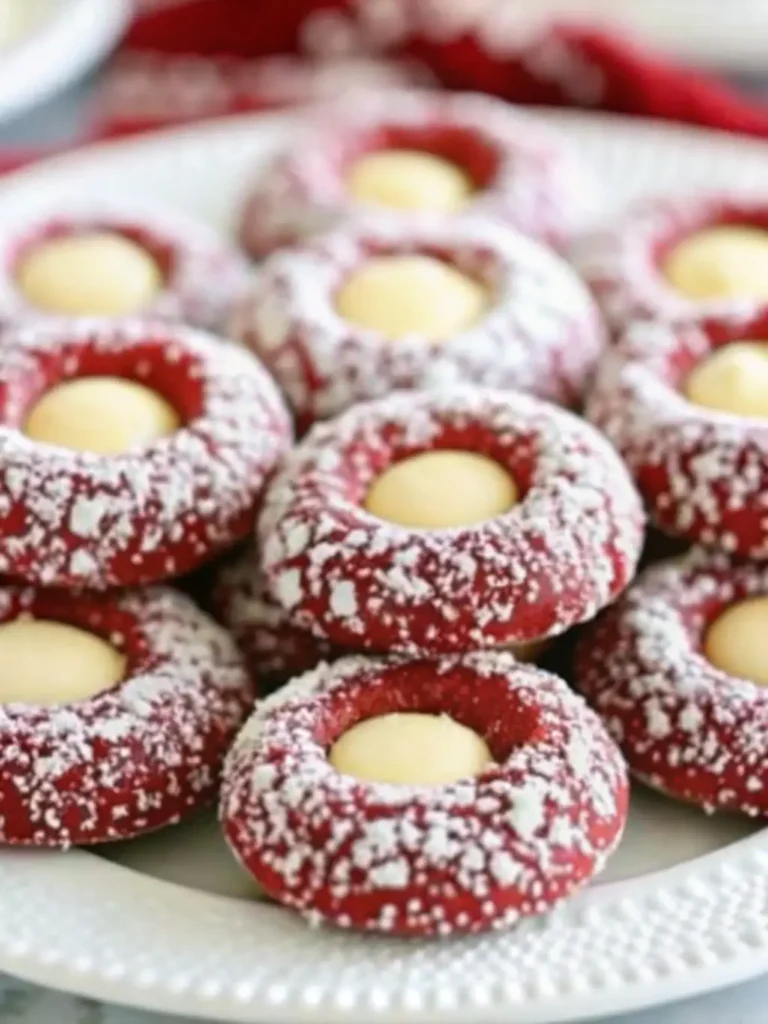
These Red Velvet Thumbprint Cookies are absolutely show-stopping! Imagine biting into a soft, buttery red velvet cookie with a rich cocoa base, filled with smooth, tangy cream cheese filling that tastes like cheesecake. The vibrant red color makes them perfect for Christmas and Valentine’s Day, while the elegant presentation and gourmet flavor make them suitable for any special occasion.
What makes these cream cheese thumbprint cookies so special is the perfect balance of flavors and textures. The subtle chocolate notes from the cocoa powder complement the tangy cream cheese filling beautifully, creating a sophisticated cookie that’s surprisingly easy to make. They look like they came from a fancy bakery, but they’re completely beginner-friendly!
Prep Time: 20 minutes
Bake Time: 12-14 minutes
Total Time: 35 minutes
Yield: 24 cookies
Table of Contents
Why You’ll Love These Red Velvet Thumbprint Cookies
Stunning Visual Appeal: The bright red cookies with creamy white centers create an eye-catching contrast that makes these cookies stand out on any dessert table.
Perfect Flavor Balance: The cocoa-rich red velvet base paired with tangy cream cheese filling creates a harmonious blend reminiscent of red velvet cake with cream cheese frosting.
Easy for Beginners: Simple ingredients and straightforward instructions make this recipe accessible even if you’re new to baking thumbprint cookies.
Versatile for Celebrations: Perfect for Christmas, Valentine’s Day, birthdays, weddings, baby showers, or any time you want an elegant treat.
Make-Ahead Friendly: The dough can be prepared ahead, and baked cookies freeze beautifully for convenient holiday baking.
Crowd-Pleasing: From kids to adults, everyone loves the fun appearance and decadent red velvet cheesecake flavor combination.
Ingredients for Red Velvet Cream Cheese Thumbprint Cookies
For the Red Velvet Cookies:
- 1 cup unsalted butter, softened to room temperature
- 1/2 cup brown sugar, packed
- 1 large egg yolk
- 1 teaspoon vanilla extract
- 2 cups all-purpose flour
- 2 teaspoons cocoa powder (unsweetened)
- 4 teaspoons red food coloring (gel preferred)
- 1/2 cup granulated sugar or sanding sugar (for rolling)
For the Cream Cheese Filling:
- 4 ounces cream cheese, softened to room temperature
- 1 large egg yolk
- 1/4 cup granulated sugar
- 1/8 teaspoon salt
- 1/4 teaspoon vanilla extract
How to Make Red Velvet Thumbprint Cookies
Step 1: Prepare Your Workspace
Preheat your oven to 350°F (175°C). Position racks in the upper and lower thirds of the oven for even baking.
Line two baking sheets with parchment paper or silicone baking mats. This prevents sticking and makes cleanup effortless.
Step 2: Make the Red Velvet Cookie Dough
In a large mixing bowl, beat the softened butter and brown sugar together using an electric mixer on medium speed. Cream for 3-4 minutes until the mixture is light, fluffy, and pale in color. This step incorporates air for tender cookies.
Add the egg yolk and vanilla extract, beating until smooth and well combined. Scrape down the sides of the bowl as needed.
In a separate medium bowl, whisk together the all-purpose flour and cocoa powder until evenly distributed.
Gradually add the flour mixture to the butter mixture, mixing on low speed just until a dough forms. Don’t overmix—stop as soon as no flour streaks remain.
Add the red food coloring and mix until the color is evenly distributed throughout the dough. The dough should be a vibrant, uniform red.
Pro Tip: Gel food coloring provides the most vivid red color without adding excess moisture. Liquid food coloring works but may require more drops and can make the dough slightly softer.
Step 3: Shape the Cookies
Place the granulated sugar or sparkling sanding sugar in a shallow bowl.
Scoop the dough into 1-inch balls (about 1 tablespoon each) using a cookie scoop for uniform size. Roll between your palms to create smooth, round balls.
Roll each dough ball generously in the sugar to coat completely. The sugar coating adds sparkle and a slight textural contrast.
Place the sugar-coated balls on the prepared baking sheets, spacing them about 2 inches apart to allow for slight spreading.
Using your thumb, the back of a 1/2 teaspoon measuring spoon, or a small rounded tool, gently press an indentation into the center of each cookie. Make the indentation deep enough to hold the filling but avoid pressing all the way through.
Tip for Perfect Indentations: If the edges crack when pressing, gently smooth them with your fingers. The dough should be at room temperature for the best results.
Step 4: Prepare the Cream Cheese Filling
In a medium bowl, beat the softened cream cheese with an electric mixer on medium speed until smooth and creamy (about 1 minute).
Add the egg yolk, sugar, salt, and vanilla extract. Beat until completely smooth and well combined, scraping the sides as needed. The filling should be thick but pourable.
Make-Ahead Option: The cream cheese filling can be prepared up to 1 day ahead and refrigerated. Let it come to room temperature and give it a quick stir before using.
Step 5: Fill and Bake the Thumbprint Cookies
Spoon or pipe the cream cheese filling into the indentation of each cookie, filling it almost to the top but not overflowing. About 1/2 to 3/4 teaspoon of filling per cookie is ideal.
Pro Tip: Use a small spoon or transfer the filling to a zip-top bag with a corner snipped off for neater filling.
Bake in the preheated oven for 12-14 minutes. The cookies are done when the edges are set and lightly golden, and the cream cheese filling is slightly puffed and just beginning to set. The filling may still look slightly soft—that’s perfect!
Avoid overbaking, as this can cause the filling to brown or crack and make the cookies dry.
Step 6: Cool and Serve
Let the red velvet thumbprint cookies cool on the baking sheets for 5 minutes. This allows them to firm up without breaking.
Carefully transfer the cookies to a wire rack to cool completely. The cream cheese filling will continue to set as it cools.
Once cooled, these cookies are ready to enjoy! Store in an airtight container in the refrigerator.
Storage and Make-Ahead Instructions
Refrigerator: Store baked cookies in an airtight container in the refrigerator for up to 5 days. The cream cheese filling requires refrigeration. Let them sit at room temperature for 10-15 minutes before serving for the best texture.
Freezing Baked Cookies: Freeze cookies in a single layer on a baking sheet until solid (about 2 hours), then transfer to a freezer-safe container with parchment paper between layers. Freeze for up to 2 months. Thaw in the refrigerator overnight.
Make-Ahead Dough: Prepare the cookie dough, shape into balls, and refrigerate for up to 24 hours before rolling in sugar and baking. You can also freeze shaped dough balls for up to 2 months. Bake from frozen, adding 2-3 minutes to the baking time.
Dough Texture Tip: If the dough becomes too soft to handle while shaping, refrigerate it for 10-15 minutes to firm up.
Expert Tips for Perfect Thumbprint Cookies
Room Temperature Ingredients: Softened butter and cream cheese are crucial for proper mixing. They should be soft enough to leave an indent when pressed but not melted or greasy.
Don’t Overfill: Fill the thumbprints almost to the top but not overflowing. The filling puffs slightly during baking, and overfilling causes spillover.
Uniform Cookie Size: Use a cookie scoop (1 tablespoon size) to ensure all cookies are the same size for even baking.
Smooth Dough Balls: Roll the dough smoothly between your palms before coating in sugar. This prevents cracks and creates prettier cookies.
Prevent Cracking: If dough cracks when making thumbprints, gently smooth the edges with your fingers. Slightly warmer dough is less prone to cracking.
Watch Baking Time: Every oven is different. Start checking at 12 minutes. The filling should be just set but still soft—it will firm as it cools.
Gel Food Coloring: Use gel or paste food coloring for the most vibrant red without adding excess liquid to the dough.
Dust Off Excess Sugar: After rolling in sugar, gently tap the dough ball to remove excess before placing on the baking sheet.
Creative Variations
Chocolate Drizzle: Once cooled, drizzle melted white or dark chocolate over the cookies for extra elegance.
Different Fillings: Try raspberry jam, strawberry jam, lemon curd, or chocolate ganache instead of cream cheese filling.
White Chocolate Chips: Press a white chocolate chip into the center of the cream cheese filling before baking for extra sweetness.
Red Velvet Sandwich Cookies: Skip the filling during baking and sandwich two cookies together with cream cheese frosting after cooling.
Sprinkle Sparkle: Add festive sprinkles to the cream cheese filling before baking for extra holiday cheer.
Nutty Coating: Roll cookies in finely chopped pecans or walnuts instead of sugar before baking for added texture.
Mini Versions: Make bite-sized thumbprint cookies using 1/2 tablespoon dough balls. Reduce baking time to 10-12 minutes.
Different Colors: Adjust food coloring for different holidays—pink for baby showers, green for St. Patrick’s Day, or blue for winter celebrations.
Serving Suggestions
These elegant red velvet thumbprint cookies are perfect for:
- Holiday Cookie Platters: Combine with sugar cookies, gingerbread, and other festive favorites
- Valentine’s Day Treats: The red color and cream cheese filling make them ideal romantic treats
- Christmas Dessert Tables: Their festive appearance fits perfectly with holiday décor
- Cookie Exchanges: Stand out with these gourmet-looking cookies
- Bridal or Baby Showers: Elegant enough for special celebrations
- Homemade Gifts: Package in decorative boxes or tins for thoughtful presents
- Afternoon Tea: Pair with coffee, hot chocolate, or tea for a sophisticated treat
Beverage Pairings: These cookies pair beautifully with coffee, hot chocolate, milk, champagne, or dessert wine.
Frequently Asked Questions
Can I use regular food coloring instead of gel? Yes, but you’ll need more drops to achieve a vibrant red, which may make the dough slightly softer. Gel or paste food coloring is recommended for the best color and consistency.
Why are my thumbprint indentations disappearing during baking? Make sure to press deep enough initially and that your dough is properly chilled. You can also re-press the indentations halfway through baking if needed (work quickly while the oven door is open).
Can I make these without cocoa powder? Yes, but they won’t have the characteristic red velvet flavor. They’ll taste more like vanilla cookies with cream cheese filling—still delicious!
How do I prevent the filling from overflowing? Don’t overfill the indentations. Fill to just below the rim, as the filling puffs slightly during baking.
Can I use salted butter? Yes, but reduce or omit the added salt in the cream cheese filling to avoid overly salty cookies.
Why did my cookies spread too much? This usually happens when the butter was too soft or the dough wasn’t chilled. Make sure butter is softened but not melted, and chill the dough if it seems too soft.
Can I double this recipe? Absolutely! This recipe doubles easily for larger batches.
Do these taste like red velvet cake? Yes! The combination of cocoa powder, vanilla, and cream cheese filling creates that classic red velvet cake flavor in cookie form.
How do I know when they’re done baking? The edges should be set and lightly golden, and the cream cheese filling should be slightly puffed but not browned. The centers may look slightly underdone—they’ll firm as they cool.
Can I add more cocoa powder for a stronger chocolate flavor? You can increase to 1 tablespoon cocoa powder, but much more will overpower the delicate red velvet flavor.
These Red Velvet Thumbprint Cookies with Cream Cheese are a show-stopping treat that combines the beloved flavors of red velvet cake with the elegance of thumbprint cookies. Whether you’re baking for the holidays or a special occasion, these cookies are guaranteed to impress!

Red Velvet Thumbprint Cookies with Cream Cheese | Easy Holiday Recipe
Equipment
- Electric mixer
- Mixing bowls
- Measuring spoons and cups
- Baking sheets with parchment paper
- Cookie Scoop
- Wire Cooling Rack
Ingredients
- 1 cup unsalted butter, softened to room temperature
- 1/2 cup brown sugar, packed
- 1 large egg yolk
- 1 tsp vanilla extract
- 2 cups all-purpose flour
- 2 tsp unsweetened cocoa powder
- 4 tsp red gel food coloring (adjust to desired shade)
- 1/2 cup granulated or sanding sugar (for rolling)
- For the Cream Cheese Filling:
- 4 oz cream cheese, softened to room temperature
- 1 large egg yolk
- 1/4 cup granulated sugar
- 1/8 tsp salt
- 1/4 tsp vanilla extract
Instructions
- Preheat oven to 350°F (175°C) and line two baking sheets with parchment or silicone mats. Position racks in the upper and lower thirds for even baking.
- In a large bowl, beat butter and brown sugar on medium speed for 3–4 minutes until light and fluffy. Add egg yolk and vanilla, mixing until smooth. In another bowl, whisk flour and cocoa powder. Gradually add dry ingredients to wet mixture just until combined. Mix in red gel food coloring until evenly distributed.
- Scoop 1-inch dough balls (about 1 tablespoon each). Roll smooth, then coat in granulated or sanding sugar. Place 2 inches apart on prepared sheets. Using your thumb or the back of a 1/2 teaspoon, press an indentation into each cookie. If cracks appear, smooth edges gently.
- Beat cream cheese until smooth. Add egg yolk, sugar, salt, and vanilla; beat until creamy and combined. The filling should be thick but spoonable.
- Spoon or pipe about 1/2–3/4 teaspoon filling into each indentation. Bake for 12–14 minutes, or until edges are set and filling is slightly puffed but not browned. Avoid overbaking.
- Cool cookies on baking sheets 5 minutes before transferring to wire racks. Let cool completely before storing. Serve at room temperature or chilled.