This post may contain affiliate links. As an Amazon Associate, we earn from qualifying purchases. We only recommend products we trust.
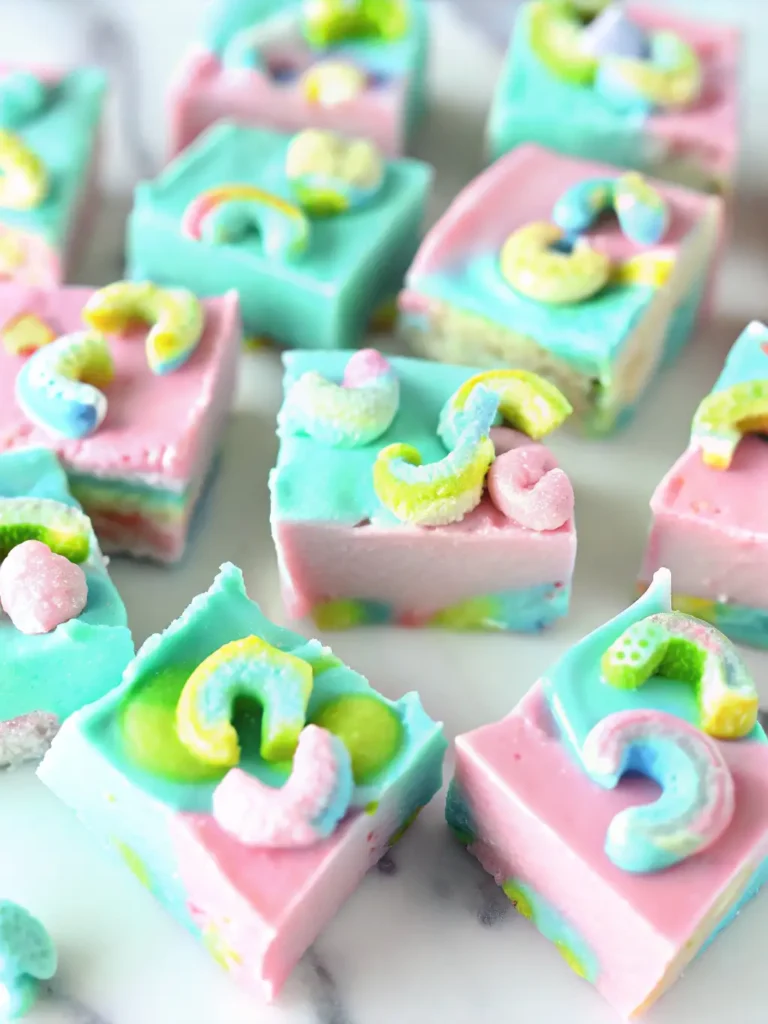
If you are looking for a dessert that is as whimsical as it is delicious, this Lucky Charms Fudge is a total showstopper. This recipe takes the classic, creamy texture of white chocolate fudge and packs it with the iconic, colorful marshmallows from your favorite childhood cereal. It is a no-bake lucky charms dessert that requires only three simple ingredients and about five minutes of active prep time.
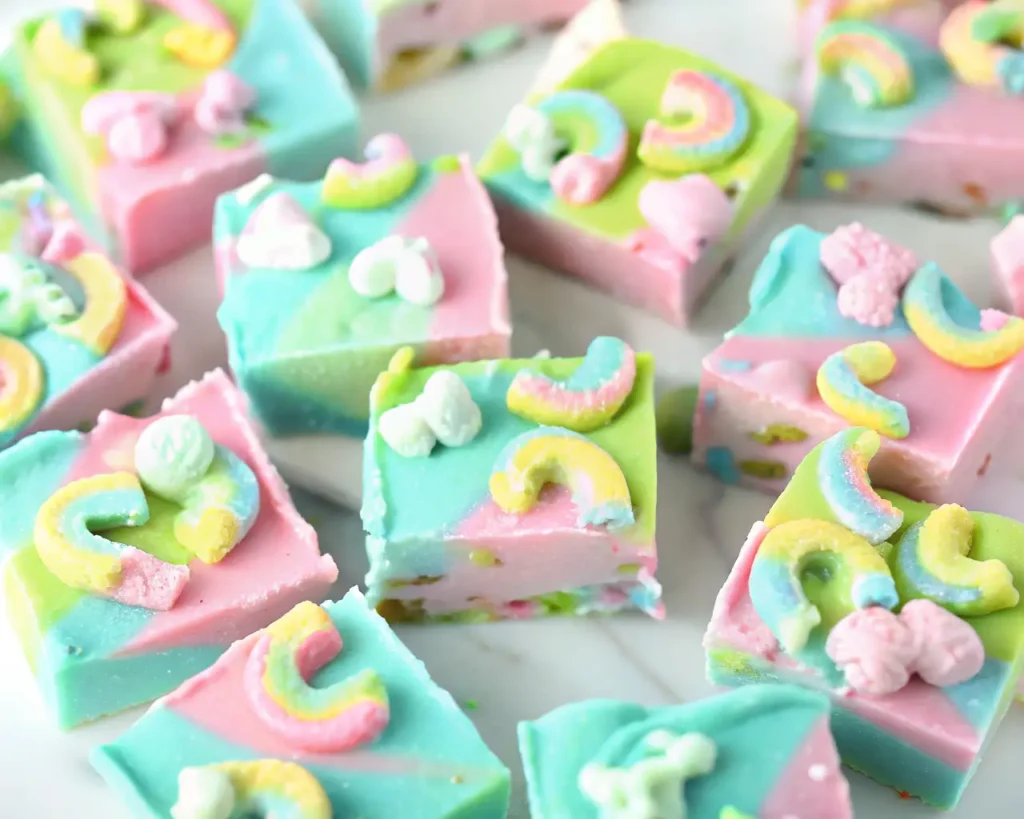
This no-bake Lucky Charms fudge is a total showstopper with its vibrant rainbow of colors and nostalgic cereal flavor. It’s perfect for St. Patrick’s Day parties, classroom treats, office potlucks, or any time you want to bring a little luck (and a lot of sweetness) to your celebration. The best part? Kids absolutely love helping make this—sorting marshmallows and decorating the top is their favorite part!
Whether you’re hosting a leprechaun-themed birthday party, need a last-minute homemade St. Patrick’s Day gift, or simply want to recreate that magical childhood cereal experience in fudge form, this white chocolate Lucky Charms fudge delivers on taste, texture, and visual wow-factor every single time.
Table of Contents
Why You’ll Love Lucky Charms Fudge
Ridiculously Easy: This 3-ingredient fudge literally takes 5 minutes of active work. Melt, stir, chill—that’s it! No complicated candy-making skills required whatsoever.
No-Bake Convenience: No oven, no stovetop boiling, no candy thermometer needed. Perfect for hot days when you don’t want to heat up the kitchen or when you’re short on time.
Kid-Friendly Recipe: Children love helping sort the marshmallows (and sneaking a few!), pressing them into the top, and adding sprinkles. It’s a fantastic family baking activity that builds confidence in young cooks.
Perfectly Creamy Texture: The secret ingredient—vanilla frosting—creates fudge that’s never grainy, never crumbly, always silky-smooth and easy to slice. No failed batches from temperature issues!
Visually Stunning: The rainbow of bright marshmallow colors against creamy white fudge makes this an Instagram-worthy St. Patrick’s Day treat that steals the show on any dessert table.
Budget-Friendly: Make a huge batch for under $8 using simple pantry ingredients and affordable cereal marshmallows. One of the most cost-effective party desserts that looks expensive!
Make-Ahead Friendly: Prepare up to 2 weeks ahead and store in the fridge. Perfect for busy hosts, teachers planning classroom parties, or anyone who likes to prep holiday treats early.
Customizable: Easily adapt with different flavors, colors, or mix-ins. Make it gluten-free, nut-free, or dairy-free with simple substitutions.
Gift-Worthy: Package in festive tins or cellophane bags for adorable homemade gifts that friends, neighbors, teachers, and coworkers genuinely appreciate.
Ingredients for Lucky Charms Fudge
This magical white chocolate fudge uses just 3 simple ingredients (plus optional decorations):
Core Ingredients:
- 2 bags (11-12 oz each) White Chocolate Chips: Use high-quality chips like Ghirardelli White Chocolate Chips or Nestlé Premier White Morsels for the smoothest melting and best flavor. Budget option: Great Value or store brand works but may require extra stirring.
- 1 container (16 oz) Vanilla Frosting: This is the secret to easy, foolproof fudge! Betty Crocker Rich & Creamy Vanilla, Duncan Hines Creamy Home-Style Vanilla, or Pillsbury Creamy Supreme Vanilla all work perfectly. The frosting provides the fats and sugars needed for perfect texture without any candy-making expertise.
- 2 cups Lucky Charms Marshmallows: You have two options:
- Buy “Marshmallows Only” bags (now widely available near the cereal aisle, especially during St. Patrick’s season—brands like Medley Hills Farm or Just Marshmallows)
- Pick them from cereal boxes (you’ll need about 2-3 boxes of regular Lucky Charms to get 2 cups of marshmallows)
Optional but Recommended:
- St. Patrick’s Day Sprinkles: Wilton Shamrock Mix, Fancy Sprinkles St. Patrick’s Collection, or any green/gold/rainbow sprinkles add festive flair
- Non-Stick Cooking Spray: For easy removal from the pan
Best Brands for Lucky Charms Fudge:
White Chocolate: Ghirardelli (smoothest), Nestlé Premier (reliable), Lindt (premium)
Frosting: Betty Crocker Rich & Creamy (best texture), Duncan Hines (budget-friendly)
Marshmallows: Medley Hills Farm Marshmallows Only, Just Marshmallows brand
Sprinkles: Wilton (widely available), Fancy Sprinkles (premium quality)
Pro Tip: Don’t use white chocolate bars or almond bark for this recipe—the chips are specifically formulated to melt smoothly and hold their shape in fudge. Bars can separate or become oily.
Step-by-Step Instructions: How to Make Lucky Charms Fudge
This easy no-bake fudge comes together in under 10 minutes of hands-on time!
Step 1: Prep Your Pan
Line an 8×8-inch or 9×9-inch square baking dish with parchment paper or aluminum foil, leaving a 2-inch overhang on two opposite sides (these act as handles for easy removal later).
Lightly spray the lined pan with non-stick cooking spray. This extra step ensures your fudge lifts out perfectly clean without sticking.
Pro Tip: If you don’t have parchment or foil, you can use wax paper, but parchment is most reliable for non-stick performance.
Step 2: Melt the White Chocolate
Place both bags of white chocolate chips (22-24 oz total) in a large microwave-safe bowl. Glass or ceramic bowls work best—they heat evenly and retain warmth.
Microwave on 50% power for 30 seconds. Remove and stir thoroughly with a rubber spatula.
Continue microwaving in 30-second intervals at 50% power, stirring well after each interval, until the chocolate is completely smooth and melted—usually 2-3 total intervals (1.5-2 minutes total time).
The finished melted chocolate should be glossy, pourable, and completely lump-free. If you still see chunks, microwave for one final 15-second interval.
Pro Tip: Using 50% power instead of full power is crucial! White chocolate scorches easily at high heat. Slow and steady wins the race for smooth, silky melting.
Step 3: Warm and Add the Frosting
Remove the lid and foil seal from your 16 oz container of vanilla frosting.
Microwave the frosting container (without lid) for 30 seconds until the frosting is slightly softened and easily pourable.
Pour the warmed frosting into the bowl of melted white chocolate.
Using a sturdy rubber spatula or wooden spoon, stir vigorously until the chocolate and frosting are completely combined into one smooth, glossy mixture (about 1-2 minutes of stirring).
The mixture should be thick, creamy, and uniform in color—like melted white chocolate ganache or thick cake batter.
Pro Tip: Make sure the frosting is truly incorporated—you shouldn’t see any streaks or swirls. Thorough mixing now prevents separation issues later.
Step 4: Fold in the Lucky Charms Marshmallows
Measure out 2 cups of Lucky Charms marshmallows. Set aside about ½ cup for decorating the top.
Working quickly (the fudge mixture starts to set as it cools!), fold in the remaining 1½ cups of marshmallows using broad, gentle folding motions.
You want the marshmallows evenly distributed throughout without crushing them. Use a gentle touch—they’re delicate!
Pro Tip: Work fast at this stage! Once you add the marshmallows, you have about 2-3 minutes before the fudge starts to firm up and becomes hard to spread.
Step 5: Spread and Decorate
Immediately pour the fudge mixture into your prepared pan.
Using an offset spatula or the back of a spoon, quickly spread the fudge into an even layer, pushing it all the way to the corners and edges.
While the surface is still soft, press the reserved ½ cup marshmallows gently into the top, spacing them evenly across the surface.
If using sprinkles, scatter them generously over the top now, while the fudge is still tacky so they stick.
Pro Tip: Create a pattern with your marshmallow placement—alternating colors or making shamrock shapes—for an extra-special presentation!
Step 6: Chill Until Set
Refrigerate the pan, uncovered, for at least 2 hours until the fudge is completely firm to the touch.
For best results, chill overnight (4-6 hours). This allows the fudge to set completely firm, making slicing much cleaner and easier.
Pro Tip: Don’t rush this step! Soft fudge is impossible to cut cleanly. If you’re in a hurry, place in the freezer for 45-60 minutes instead, but refrigeration produces better texture.
Step 7: Lift and Slice
Once fully chilled and firm, use the parchment paper overhang as handles to lift the entire block of fudge out of the pan.
Place on a cutting board. Using a large, sharp chef’s knife, cut into small squares (6×6 grid = 36 pieces, or 8×8 grid = 64 mini pieces).
For the cleanest cuts, warm your knife under hot running water, dry it quickly, then make one cut. Wipe the knife clean with a damp cloth, warm it again, and repeat for each cut.
Pro Tip: Fudge cuts most cleanly when cold, so work quickly. If it starts to soften, pop it back in the fridge for 10 minutes.
Step 8: Serve and Enjoy
Arrange your beautiful Lucky Charms fudge squares on a serving platter, in gift boxes, or store in airtight containers.
Serve chilled for best texture—the fudge softens at room temperature but is perfectly delicious either way!
Pro Tips for Perfect Lucky Charms Fudge Every Time
Use 50% Power for Melting: Full microwave power scorches white chocolate easily. Always use 50% (medium) power and short intervals with thorough stirring. Patience prevents ruined batches!
Don’t Skip the Frosting Warming: Cold frosting is too thick to incorporate smoothly. Warming it for 30 seconds makes mixing effortless and prevents lumps.
Work Quickly After Adding Marshmallows: The fudge mixture sets as it cools. Once you add the marshmallows, work fast—you have 2-3 minutes max before it becomes too stiff to spread.
Choose Quality White Chocolate: Higher-quality chips (Ghirardelli, Nestlé Premier) melt more smoothly than budget brands. If using budget chips, add ½ tablespoon coconut oil to help with melting.
Sort Marshmallows Carefully: If picking from cereal boxes, keep marshmallows as dry as possible. Rinse your hands between sorting to avoid transferring cereal dust that can make fudge grainy.
Line Pan Properly: Proper parchment overhang makes removal foolproof. Don’t skip this step or you’ll be digging fudge out of the pan corner by corner!
Chill Thoroughly: Under-chilled fudge won’t slice cleanly and may fall apart. Always err on the side of longer chilling time—overnight is ideal.
Use a Hot Knife: The warmth helps the knife glide through without dragging. This simple trick is the difference between jagged chunks and bakery-perfect squares.
Store Cold: This fudge is best kept refrigerated. It will soften considerably at room temperature and can even melt in warm weather.
Creative Variations for White Chocolate Fudge
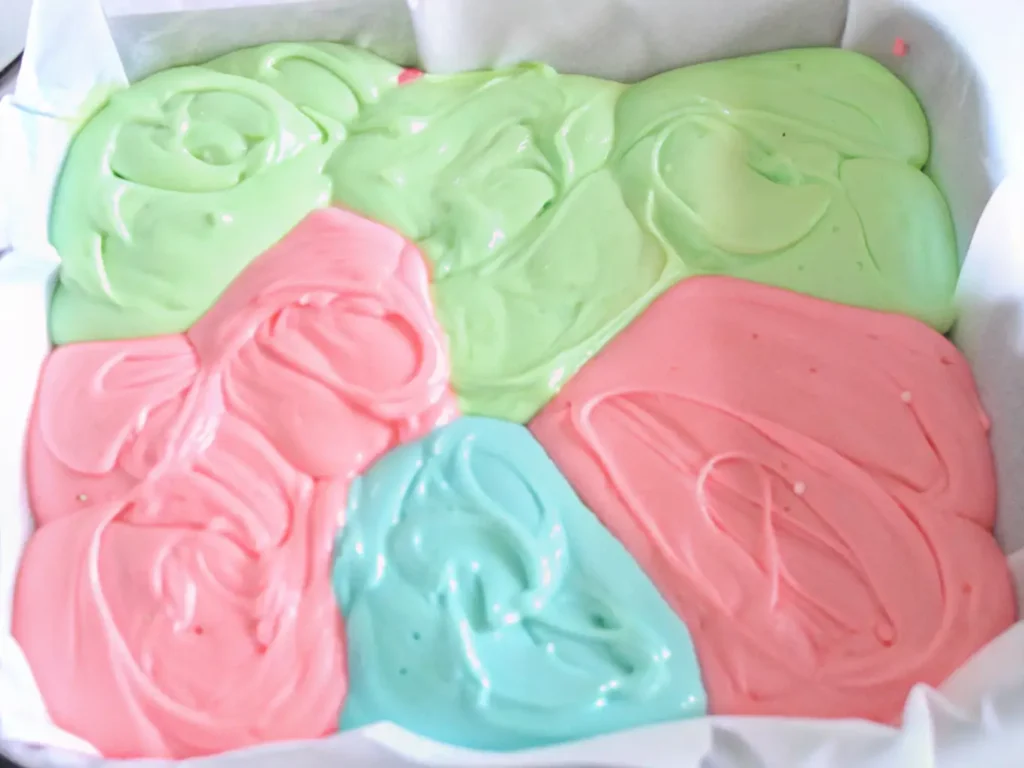
Rainbow Swirl Fudge:
Divide the fudge mixture into 3 bowls. Tint each with different gel food colors (green, pink, blue). Layer or marble them in the pan for a psychedelic rainbow effect. Top with rainbow sprinkles!
Mint Chocolate Lucky Fudge:
Add ½ teaspoon peppermint extract to the white chocolate mixture. Use green candy melts instead of white chocolate chips. Top with crushed Andes mints for minty St. Patrick’s perfection.
Cookies & Cream Lucky Fudge:
Fold in 1 cup crushed Oreos along with the marshmallows. Use half white chocolate, half dark chocolate chips. Top with mini Oreos and marshmallows.
Peanut Butter Lucky Fudge:
Replace white chocolate chips with peanut butter chips. Use peanut butter frosting instead of vanilla. Add mini Reese’s Pieces with the marshmallows. Not safe for nut allergies but beloved by PB lovers!
Golden Pot of Gold Fudge:
Use yellow candy melts instead of white chocolate. Replace regular marshmallows with banana-flavored marshmallows. Top with gold star sprinkles and gold-wrapped chocolate coins.
Funfetti Lucky Fudge:
Mix ½ cup rainbow sprinkles into the fudge mixture with the marshmallows. Use funfetti frosting. Top with extra colorful sprinkles for a birthday cake version.
Dairy-Free Lucky Fudge:
Use dairy-free white chocolate chips (Enjoy Life brand). Use dairy-free frosting (Duncan Hines Creamy Home-Style is accidentally vegan). Check marshmallow brands for gelatin-free options.
Sugar-Free Lucky Fudge:
Use sugar-free white chocolate chips (Lily’s brand). Use sugar-free frosting (Swerve makes one). Skip the Lucky Charms and use sugar-free marshmallows if available, or just use sprinkles.
Shamrock Fudge:
Tint the white chocolate mixture with green gel food coloring. Use only green shamrock-shaped sprinkles. Cut into shamrock shapes using cookie cutters after setting.
Lucky Charms Bark (Thinner Version):
Spread the fudge mixture onto a large parchment-lined baking sheet in a thin layer (about ¼ inch thick). Break into irregular shards once set for candy bark instead of squares.
For the ultimate collection of festive, top-rated holiday bakes, don’t miss our master guide to THE BEST 20 ST PATRICK’S DAY DESSERTS & TREATS IDEAS!
How to Store and Freeze Lucky Charms Fudge
Room Temperature Storage:
Lucky Charms fudge can be stored at room temperature for up to 3 days in an airtight container, but it will soften considerably, especially in warm weather.
Best practice: Keep at room temperature only if serving within a few hours, or if your home is cool (below 70°F).
Refrigerator Storage (Recommended):
Store in an airtight container in the refrigerator for up to 2 weeks (not just 2 weeks—it actually lasts this long!).
Layer pieces between sheets of parchment or wax paper to prevent sticking.
Bring to room temperature for 15-20 minutes before serving if you prefer softer texture, or serve straight from the fridge for firmer fudge.
Pro Tip: Add a sheet of parchment paper on top of the fudge before sealing the container to absorb any condensation and prevent surface stickiness.
Freezer Storage:
Yes, you can freeze Lucky Charms fudge! Properly stored, it freezes beautifully for up to 3 months.
To freeze:
- Cut into individual pieces
- Layer between parchment paper in airtight containers or freezer bags
- Press out excess air and seal tightly
- Label with date
To thaw:
- Transfer to refrigerator overnight for gradual thawing (best method)
- Or leave at room temperature for 30-60 minutes for quick thawing
- Do not microwave to thaw—it will melt unevenly
Freezer Pro Tip: Freeze individual portions in small bags for grab-and-go treats, lunch box additions, or easy gifting!
Make-Ahead Timeline:
2 weeks before: Make fudge, store in fridge
1 week before: Perfect time to make for freshness
3 days before: Make if storing at cool room temperature
Day of event: Remove from fridge, let sit 15 minutes, arrange on platter
This makes Lucky Charms fudge ideal for stress-free party planning!
Serving and Gift Ideas for Lucky Charms Fudge
Portion Sizes and Servings:
This recipe yields:
- 36 pieces (1.5-inch squares) – standard serving
- 64 pieces (1-inch squares) – mini bite-size
- 16 pieces (2-inch squares) – generous dessert portions
Serving size: 1-2 pieces per person depending on richness tolerance
Presentation Ideas:
For Parties:
- Arrange on a green serving platter with shamrock decorations
- Create a pot of gold display by surrounding with gold chocolate coins
- Stack in a pyramid on a cake stand for height
- Mix with other green treats on a St. Patrick’s dessert table
For Classroom:
- Individual bags: 1-2 pieces per student in small cellophane bags
- Cupcake liner portions: Place 2 pieces in green cupcake liners
- Shared platter: Arrange on disposable platter with shamrock picks
For Office/Potluck:
- Tiered display: Use a multi-level server for visual impact
- Labels: Include ingredient list for allergy awareness
- Serving utensils: Provide small tongs or toothpicks
Gift Packaging Ideas:
For Teachers/Neighbors:
- Clear cellophane bags tied with green ribbon and gift tags
- Small decorative tins with “Lucky Fudge” labels
- Mason jars layered with parchment (shows off the colors)
- White bakery boxes with window tops
For Large Batches:
- Decorative popcorn tins re-purposed for St. Patrick’s
- Green Chinese takeout boxes (craft stores)
- Gold-toned gift boxes with tissue paper
- Clear acrylic boxes tied with raffia
For Elegant Gifts:
- White or gold foil-covered boxes
- Stacked in clear glass apothecary jars
- Wrapped in green wax paper and twine
- Placed in small wooden crates with wood wool
Gift Tags to Include:
- “You’re Lucky to Have This Fudge!”
- “Pot O’ Fudge from [Your Name]”
- “Magically Delicious”
- Recipe card so they can make their own
Beverage Pairings:
For Kids:
- Cold milk (whole or chocolate)
- Hot cocoa with marshmallows
- Vanilla milkshakes
- Apple juice
For Adults:
- Irish coffee
- Bailey’s on the rocks
- Champagne or prosecco
- Hot tea (earl grey pairs beautifully)
- Guinness beer (sweet and bitter contrast)
Frequently Asked Questions About Lucky Charms Fudge
Q: Can I use almond bark instead of white chocolate chips?
A: Yes, but the texture will be slightly different. Almond bark (also called vanilla candy coating) sets firmer than white chocolate chips. Use the same amount (22-24 oz) and melt the same way. The flavor is slightly less creamy but still delicious.
Q: Why did my fudge turn out oily or separated?
A: This happens when white chocolate is overheated. White chocolate contains cocoa butter that separates when scorched. Prevention: Always use 50% microwave power and short intervals. Fix: Stir in 1-2 tablespoons of room-temperature milk or cream, one at a time, until it comes back together.
Q: My fudge is too soft and won’t set. What went wrong?
A: Causes: (1) Didn’t chill long enough—give it more time, (2) Too much frosting relative to chocolate—measure accurately, (3) Used low-fat or whipped frosting instead of regular—these don’t set properly. Fix: Add ½ cup more melted white chocolate, stir well, and re-chill.
Q: Can I use different types of frosting?
A: Yes! Cream cheese frosting, marshmallow frosting, or buttercream all work beautifully. Chocolate frosting creates a cookies-and-cream effect. Strawberry frosting makes pink fudge. Just make sure it’s full-fat, not whipped or light.
Q: How do I make this nut-free for school?
A: This recipe is naturally nut-free! Just verify all your ingredients are made in nut-free facilities by checking labels. Look for “may contain” warnings and choose brands that are certified nut-free if needed. Lucky Charms cereal is made in a facility that also processes tree nuts, so check with school policies.
Q: Can I make this gluten-free?
A: Yes! Use gluten-free Lucky Charms (clearly marked on the box). Verify white chocolate chips and frosting are gluten-free (most are, but always check labels). Many brands like Ghirardelli and Duncan Hines are naturally GF.
Q: The marshmallows sank to the bottom. How do I prevent this?
A: The fudge mixture was too thin/warm when you added them. Next time: (1) Let the chocolate-frosting mixture cool slightly (2-3 minutes) before folding in marshmallows, or (2) Work faster once marshmallows are added so they don’t have time to sink before the fudge sets.
Q: Can I double or triple this recipe?
A: Absolutely! This recipe scales perfectly:
- Double batch: Use a 9×13-inch pan
- Triple batch: Use two 9×9-inch pans or one large roasting pan
- Quadruple batch: Two 9×13 pans
Melting time increases slightly for larger batches—add an extra 30-second interval or two.
Q: How long does Lucky Charms fudge last?
A:
- Room temperature: 3 days max (texture best within 1-2 days)
- Refrigerator: 2 weeks in airtight container
- Freezer: 3 months properly wrapped
Q: Can I use fresh marshmallows instead of the cereal ones?
A: Yes, but you’ll lose the rainbow colors that make this fudge special. Use mini marshmallows (they’re closer in size to Lucky Charms) and consider adding rainbow sprinkles for color. You could also use Jet-Puffed StackerMallows and cut into small pieces.
Q: My kids want to help. What can they do safely?
A:
- Ages 3-5: Sorting marshmallows by color, pressing marshmallows into top, adding sprinkles (all supervised)
- Ages 6-9: Measuring marshmallows, stirring frosting into chocolate (with supervision), helping spread in pan
- Ages 10+: Measuring ingredients, monitoring microwave with adult nearby, complete assembly with oversight
Never let kids handle hot melted chocolate alone!
Q: Is there a way to make this healthier?
A: Somewhat—replace white chocolate with dark chocolate chips (higher antioxidants, less sugar). Use reduced-sugar frosting. Add crushed freeze-dried fruit instead of all marshmallows for vitamins. But honestly, this is a treat—enjoy it as-is occasionally rather than trying to make candy “healthy.”
Q: Can I add other mix-ins besides marshmallows?
A: Absolutely! Try adding:
- Mini chocolate chips
- Crushed Oreos
- Chopped nuts (if no allergies)
- Dried fruit (cranberries, cherries)
- Crushed pretzels (sweet-salty)
- M&Ms or Skittles
- Rainbow sprinkles mixed in
- Graham cracker pieces
Q: Why do you recommend 50% power instead of full power in the microwave?
A: White chocolate is extremely heat-sensitive. Full power creates hot spots that scorch the chocolate before other parts are even melted, causing it to seize (become grainy and unworkable). 50% power heats gently and evenly, preventing this common problem.
Lucky Charms Fudge
Equipment
- large microwave-safe bowl
- Rubber Spatula
- 8×8 or 9×9-inch baking dish
- Parchment paper or foil
- Sharp Knife
Ingredients
- 22-24 oz white chocolate chips
- 16 oz vanilla frosting
- 1.5 cups Lucky Charms marshmallows
- 0.5 cup Lucky Charms marshmallows (for topping)
- non-stick cooking spray (optional)
- St. Patrick’s Day sprinkles (optional)
Instructions
- Line an 8×8 or 9×9-inch baking dish with parchment paper leaving an overhang for easy removal. Lightly spray with non-stick spray if desired.
- Place white chocolate chips in a microwave-safe bowl. Microwave at 50% power in 30-second intervals, stirring after each, until completely melted and smooth.
- Microwave the vanilla frosting for about 30 seconds until softened and pourable.
- Pour the warm frosting into the melted white chocolate and stir vigorously until smooth and fully combined.
- Quickly fold in 1½ cups Lucky Charms marshmallows using gentle folding motions to avoid crushing them.
- Spread the mixture evenly into the prepared pan. Press the remaining ½ cup marshmallows on top and sprinkle with decorations if using.
- Refrigerate for at least 2 hours or overnight until firm. Lift from the pan using the parchment paper and cut into small squares before serving.
Notes
Why This Is the Best Lucky Charms Fudge Recipe
This Lucky Charms fudge recipe has earned its place as a St. Patrick’s Day tradition for one simple reason: it’s foolproof. Unlike traditional fudge recipes that require precise temperatures, constant stirring, and candy-making expertise, this 3-ingredient no-bake fudge succeeds every single time with minimal effort.
The secret is using vanilla frosting as the base instead of sugar syrup or condensed milk. This grocery store shortcut provides the perfect ratio of fats, sugars, and stabilizers to create smooth, creamy, sliceable fudge without any of the finicky temperature control that ruins so many homemade fudge attempts.
The nostalgic Lucky Charms marshmallows transform this from “just another white chocolate fudge” into a whimsical, colorful celebration that appeals to kids and adults alike. There’s something magical about seeing those childhood cereal shapes suspended in creamy fudge—it’s playful, it’s delicious, and it’s undeniably photogenic.
Whether you’re making this for a St. Patrick’s Day party, a classroom celebration, or simply because you’re craving something sweet and lucky, this fudge delivers on flavor, texture, and visual appeal. It’s the kind of recipe you’ll make once and then keep making year after year, each time wondering how something so impressive could possibly be so easy.
More Lucky St. Patrick’s Day Desserts
Once you’ve mastered this Lucky Charms fudge, try these other festive St. Patrick’s Day treats:
- Shamrock Shake Fudge: Mint-flavored white chocolate fudge
- Rainbow Bark: Colorful chocolate bark with Lucky Charms
- Leprechaun Bait: Sweet snack mix with popcorn and candy
- Green Velvet Cupcakes: Vibrant green cake with cream cheese frosting
- Irish Cream Brownies: Boozy chocolate brownies for adults
- Pot of Gold Cookies: Sugar cookies decorated as gold pots
- Lucky Charms Treats: Like Rice Krispie treats but with Lucky Charms
- Mint Oreo Bark: Easy chocolate bark with crushed Oreos
The 3-ingredient fudge technique you’ve learned here works for countless variations—just change the chocolate type, frosting flavor, and mix-ins for Christmas, Valentine’s, Easter, Halloween, or birthday celebrations!