This post may contain affiliate links. As an Amazon Associate, we earn from qualifying purchases. We only recommend products we trust.
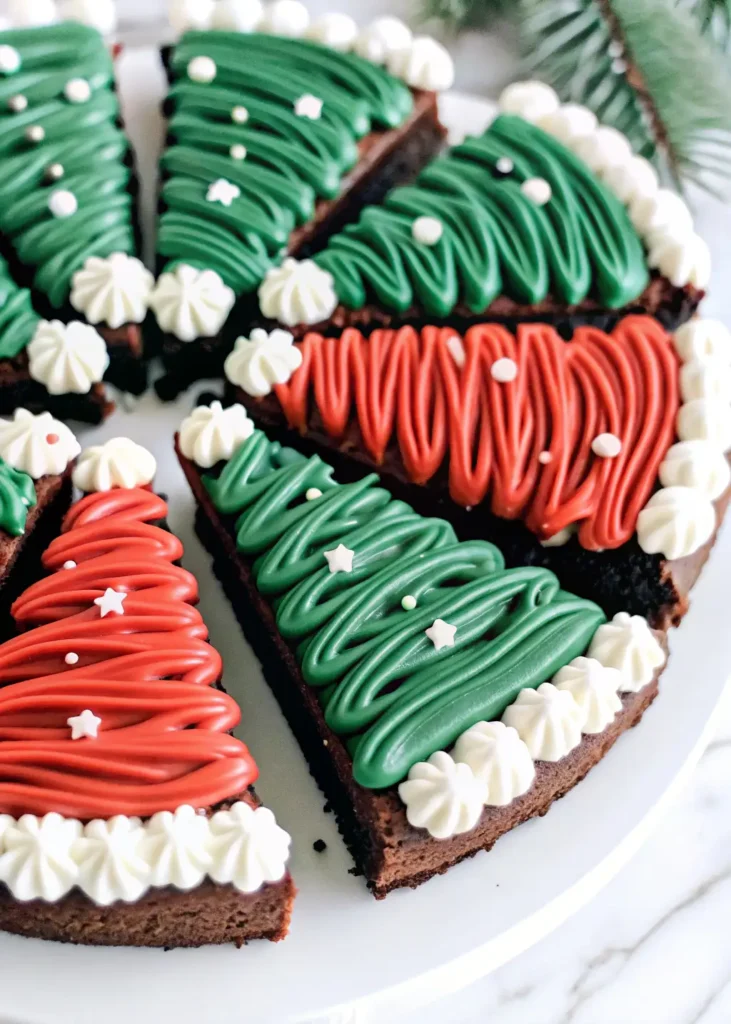
These frosted Christmas brownies are the easiest festive dessert for your holiday celebrations. Rich, fudgy brownies are cut into triangles and decorated with colorful buttercream frosting to create adorable Christmas trees and Santa hats. Perfect for holiday parties, cookie exchanges, or Christmas movie nights, these decorated brownies look impressive but require minimal decorating skills. Using boxed brownie mix makes preparation incredibly simple, while the creative shapes and colorful frosting make them special enough for any festive gathering.
The beauty of these Christmas brownies lies in their versatility and accessibility. Even if you’ve never decorated desserts before, you can create these adorable holiday treats. The triangle shape naturally lends itself to Christmas trees and Santa hats—no intricate piping or artistic skills required. Kids love helping with the decorating, making this a fun family activity during the holiday season. Best of all, you can customize the decorations with different colors, sprinkles, and edible embellishments to match your party theme.
Table of Contents
Why These Christmas Brownies Are Perfect for Parties
These festive brownies check all the boxes for successful holiday entertaining. They’re incredibly easy—using boxed brownie mix eliminates complicated baking, and the simple decorating takes just minutes per brownie. The result looks professional and festive, making guests think you spent hours creating them. The individual portions eliminate the need for plates and utensils, making them perfect for stand-up parties or buffet-style gatherings.
The flavors appeal to everyone. Rich, chocolatey brownies paired with sweet buttercream frosting create a classic combination that both kids and adults love. The brownies stay moist for days when stored properly, and you can make them a day or two ahead of your event. This advance preparation capability is invaluable during the busy holiday season when time is precious.
These Christmas brownies also work beautifully for multiple occasions. Serve them at holiday parties, pack them for cookie exchanges, include them in dessert gift boxes, or simply enjoy them during family movie nights. Their festive appearance instantly elevates any dessert table and photographs beautifully for social media sharing.
Ingredients for Frosted Christmas Brownies
Brownies:
- 2 boxes brownie mix (plus ingredients listed on boxes: eggs, oil, water)
- OR 1 double batch homemade brownies
- Cooking spray or butter for greasing pan
Frosting and Decorations:
- 1-3 jars white buttercream frosting (16 oz each)
- Red gel food coloring
- Green gel food coloring
- Edible gold star sprinkles
- White pearl sprinkles
- Red pearl sprinkles (optional)
- Green jimmies or sprinkles (optional)
Equipment:
- 9-inch springform pan
- 3 piping bags
- Large star tip (1M recommended)
- Round tip (optional, for Santa hat trim)
Understanding Key Ingredients
Boxed Brownie Mix: Using boxed mix makes this recipe incredibly easy and consistent. Choose your favorite brand—fudgy varieties work best for rich, dense brownies that hold their shape when cut. You’ll need two boxes to create thick, substantial brownies in the springform pan. Follow the package instructions for oil, eggs, and water.
Springform Pan: A 9-inch springform pan creates perfectly round brownies that are easy to release and cut into uniform triangles. The removable sides make unmolding foolproof. If you don’t have a springform pan, you can use a regular 9-inch round cake pan lined with parchment paper with overhang for easy removal.
White Buttercream Frosting: Store-bought white frosting is perfect for tinting with food coloring and pipes beautifully. Buy 1-3 jars depending on how heavily you want to frost the brownies and how many you’re decorating as trees vs. hats. Homemade buttercream works too if you prefer making your own.
Gel Food Coloring: Gel or paste food coloring creates vibrant colors without thinning the frosting. Use red gel to make pink/red frosting for Santa hats and green gel for Christmas tree frosting. Start with a small amount and add gradually until you achieve your desired shade. Liquid food coloring works but requires more and can make frosting runny.
Edible Decorations: Gold star sprinkles make perfect tree toppers, while white pearl sprinkles create “snow” or ornaments. Get creative with your decorations—use any holiday sprinkles, edible glitter, or candy decorations you like. Mini chocolate chips, M&Ms, or candy cane pieces all work beautifully.
Piping Tips: A large star tip (1M or 2D) creates beautiful textured frosting that looks like a decorated tree or Santa’s hat trim. Round tips work for smooth lines and details. If you don’t have piping tips, you can spread frosting with an offset spatula or knife, though piping creates more professional-looking results.
How to Make Frosted Christmas Brownies
Step 1: Bake the Brownies
Preheat your oven according to the brownie box instructions (typically 325-350°F). Thoroughly spray a 9-inch springform pan with cooking spray or grease with butter, making sure to coat the sides well.
Prepare both boxes of brownie mix according to package directions, combining all ingredients in a large bowl and mixing until just combined. Don’t overmix—some lumps are fine. Pour the combined batter into the prepared springform pan, spreading evenly.
Bake until a toothpick inserted in the center comes out with just a few moist crumbs—this typically takes longer than the package directions suggest since you’re using a double batch. Start checking around the recommended time, but expect to add 10-20 minutes for the thicker brownie. The top should look set and the edges should pull away slightly from the pan.
Step 2: Cool and Release
Let the brownies cool in the pan for about 15-20 minutes, then run a knife around the edge to loosen. Release the springform pan sides carefully. Allow the brownie to cool completely on a wire rack—this takes about 1-2 hours. Don’t rush this step; warm brownies will crumble when cut and the frosting will melt.
Once completely cool, carefully transfer the round brownie to a cutting board using a large spatula or by sliding it off the springform pan base.
Step 3: Cut into Triangles
Using a long, sharp knife, cut the round brownie like a pizza into 8 equal triangular wedges. For clean cuts, wipe the knife clean between each cut. The triangles will naturally look like Christmas trees pointing up or Santa hats pointing down, depending on how you orient them.
You can cut into 8, 10, or 12 pieces depending on your desired serving size. More pieces mean smaller, bite-sized brownies.
Step 4: Prepare Colored Frosting
Divide the white frosting among three bowls. Leave one bowl white (you’ll need less of this—about 1/3 jar). To the second bowl, add red gel food coloring and stir until you achieve your desired shade of red or pink for Santa hats. Start with a small amount (1/4 teaspoon) and add gradually—you can always add more but can’t remove it.
To the third bowl, add green gel food coloring and mix until you achieve Christmas tree green. Again, start small and build color gradually. The amount needed depends on the brand and intensity of your food coloring.
Step 5: Fill Piping Bags
Fit three piping bags with your chosen tips. A large star tip (1M) works beautifully for both designs. Fill one bag with green frosting, one with red frosting, and one with white frosting. If you’re new to piping, don’t overfill the bags—fill only halfway for better control.
Twist the top of each bag to push frosting toward the tip and eliminate air pockets. Keep the bags you’re not using covered with a damp towel so the frosting doesn’t dry out.
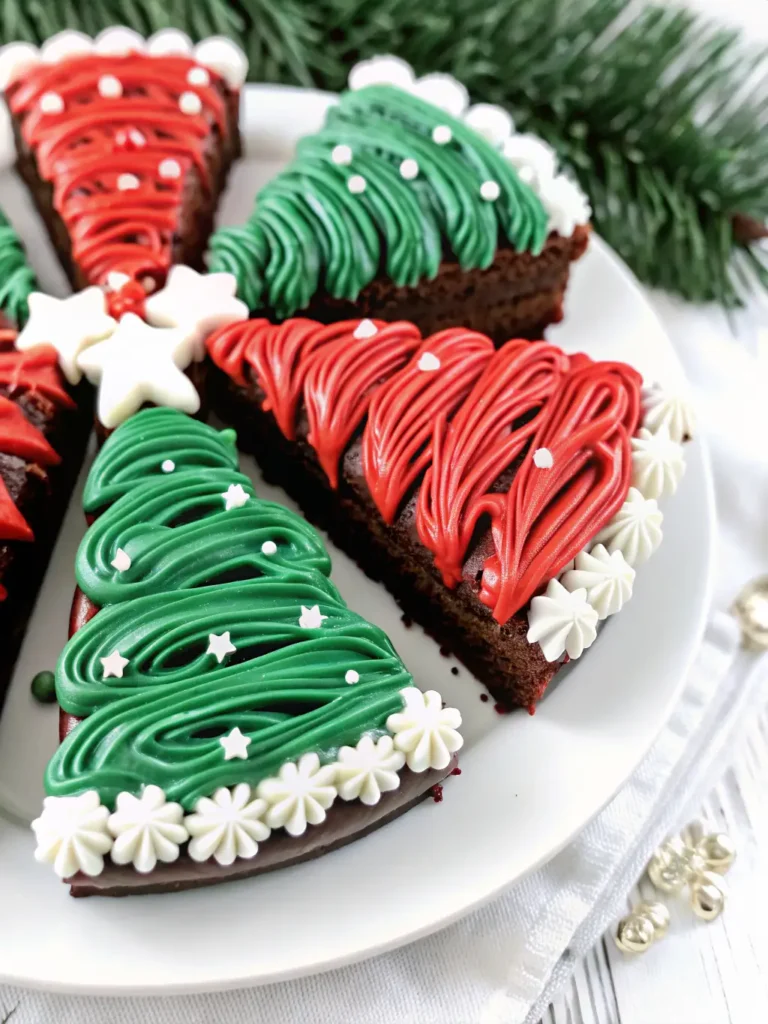
Step 6: Decorate Christmas Trees
For Christmas tree brownies, position the triangle with the point facing up. Using the green frosting and star tip, pipe horizontal rows of stars or zigzag lines from the bottom of the triangle to the top, creating a layered tree effect. Each row should overlap slightly with the row below.
Immediately add white pearl sprinkles along the frosting to create “snow” or “ornaments.” Finish by pressing an edible gold star at the top point as the tree topper. You can also add green jimmie sprinkles or other small decorations.
Step 7: Decorate Santa Hats
For Santa hat brownies, position the triangle with the point facing down. Using red frosting with a star tip, pipe the entire triangle in red, creating a textured hat shape. Start at the bottom and work toward the point.
Using white frosting with a star tip or round tip, pipe a thick band across the bottom of the triangle to create the hat’s trim. Add a white pompom at the pointed tip by piping a dollop or rosette. You can add white pearl sprinkles to the white trim for extra texture.
Step 8: Let Set and Serve
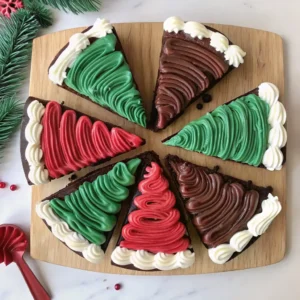
Allow the frosted brownies to sit for 15-20 minutes so the frosting sets slightly. This makes them easier to handle and stack if needed. Arrange on a festive platter or in a decorative box for gifting. These brownies look stunning displayed together—the variety of trees and hats creates a colorful, festive presentation.
Pro Tips for Beautiful Christmas Brownies
Use Room Temperature Frosting: Frosting that’s too cold is difficult to pipe smoothly. Let refrigerated frosting sit at room temperature for 30 minutes before using.
Don’t Overbake Brownies: Remove from the oven when a toothpick comes out with moist crumbs, not completely clean. Overbaked brownies are dry and crumbly.
Clean Cuts: Wipe your knife clean between each cut for neat edges. A warm knife also helps—dip in hot water and dry before each cut.
Practice Piping: If you’re new to piping, practice on parchment paper before decorating your brownies. You’ll get the hang of it quickly!
Work Quickly: Decorate one brownie completely before moving to the next so the frosting is still tacky when you add sprinkles.
Get Creative: Don’t worry about perfection—each brownie will look unique and handmade, which adds charm.
Creative Variations and Ideas
Candy Cane Brownies: Use peppermint-flavored brownie mix and top with crushed candy canes for a minty twist.
Snowman Brownies: Cut brownies into circles and stack with frosting between layers to create snowmen. Decorate with candy eyes, orange candy corn nose, and chocolate chip buttons.
Reindeer Brownies: Use chocolate frosting and add pretzel antlers, candy eyes, and red M&M noses.
Gingerbread Brownies: Add gingerbread spices to brownie batter and use brown frosting to create gingerbread man designs.
Snowflake Brownies: Cut into squares and use white frosting to pipe delicate snowflake designs on top.
Different Colors: Use blue frosting for Hanukkah, or purple and gold for New Year’s celebrations.
Homemade Brownies: Use your favorite homemade brownie recipe instead of boxed mix for a from-scratch version.
Storage and Make-Ahead Instructions
Room Temperature Storage: Store undecorated brownies in an airtight container at room temperature for up to 3 days. Once frosted, keep at room temperature for up to 2 days if using buttercream frosting.
Refrigerator Storage: Frosted brownies can be refrigerated in an airtight container for up to 5 days. Let come to room temperature before serving for the best texture—cold brownies can be dense.
Freezer Storage: Freeze unfrosted brownies wrapped tightly in plastic wrap and aluminum foil for up to 3 months. Thaw at room temperature and decorate when needed. Frosted brownies can be frozen but may lose some visual appeal—freeze in a single layer, then transfer to containers once solid.
Make-Ahead Tips: Bake brownies 1-2 days ahead and store at room temperature. Decorate the day of or day before your event for the freshest appearance. Frosting can be prepared and colored ahead, stored in the refrigerator, then brought to room temperature before using.
Frequently Asked Questions
Can I use just one box of brownie mix? Yes! One box will create thinner brownies but still tastes delicious. Adjust baking time according to package directions—it will be shorter than the double batch.
What if I don’t have a springform pan? Use a regular 9-inch round cake pan lined with parchment paper with overhang for easy removal. You can also use a square pan and cut brownies into triangles from squares.
Can I make these without piping bags? Yes! Spread frosting with an offset spatula or butter knife, or use a zip-top bag with the corner snipped off as a makeshift piping bag.
Why is my frosting too runny? You may have added too much liquid food coloring. Add more powdered sugar to thicken, or refrigerate briefly to firm up.
Can I use homemade frosting? Absolutely! Use your favorite buttercream recipe. You’ll need about 3 cups total frosting.
How far ahead can I decorate these? Decorate 1-2 days before your event. Store in a single layer in an airtight container to protect the decorations.
Can kids help with this recipe? Yes! Kids can help mix brownies, add sprinkles, and pipe frosting with supervision. It’s a fun holiday activity.
These frosted Christmas brownies are guaranteed to be the hit of your holiday party. With their festive appearance and delicious chocolate flavor, they’re the perfect combination of easy and impressive!
Frosted Christmas Brownies
Equipment
- 9-inch springform pan
- Mixing bowls
- Hand mixer or spatula
- Piping bags
- Star piping tip (1M)
- Sharp Knife
- Cooling rack
Ingredients
- Brownies
- 2 boxes brownie mix (plus eggs, oil, and water as directed on boxes)
- 1 tbsp butter or cooking spray, for greasing pan
- Frosting & Decorations
- 1-3 jars white buttercream frosting (16 oz each)
- 1 tsp red gel food coloring
- 1 tsp green gel food coloring
- 1 tbsp edible gold star sprinkles
- 2 tbsp white pearl sprinkles
- 2 tbsp red or green sprinkles (optional)
Instructions
- Preheat oven to 350°F (or as directed on mix). Grease a 9-inch springform pan. Prepare both brownie mixes according to box directions and pour into the pan. Bake until a toothpick inserted in the center comes out with a few moist crumbs, about 10–20 minutes longer than the box time. Cool completely.
- Cool brownies 15–20 minutes, loosen edges, and remove springform ring. Let cool completely on a rack for 1–2 hours before cutting.
- Transfer cooled brownie to a cutting board. Cut into 8–12 wedges like a pizza for Christmas tree or Santa hat shapes. Wipe the knife clean between cuts for neat edges.
- Divide white frosting into three bowls: one white, one tinted red with gel food coloring, and one tinted green. Mix until desired shades are reached.
- Fit three piping bags with a large star tip (1M) or round tip. Fill with white, red, and green frostings. Twist tops to remove air.
- Position triangles with the point up. Pipe green frosting in rows to resemble tree branches. Add white pearl sprinkles and a gold star on top.
- Position triangles with the point down. Pipe red frosting over the triangle for the hat. Add a white band at the bottom and a small white rosette at the tip for the pompom.
- Allow frosting to set for 15–20 minutes before serving or packaging. Arrange on a festive platter and enjoy!