This post may contain affiliate links. As an Amazon Associate, we earn from qualifying purchases. We only recommend products we trust.
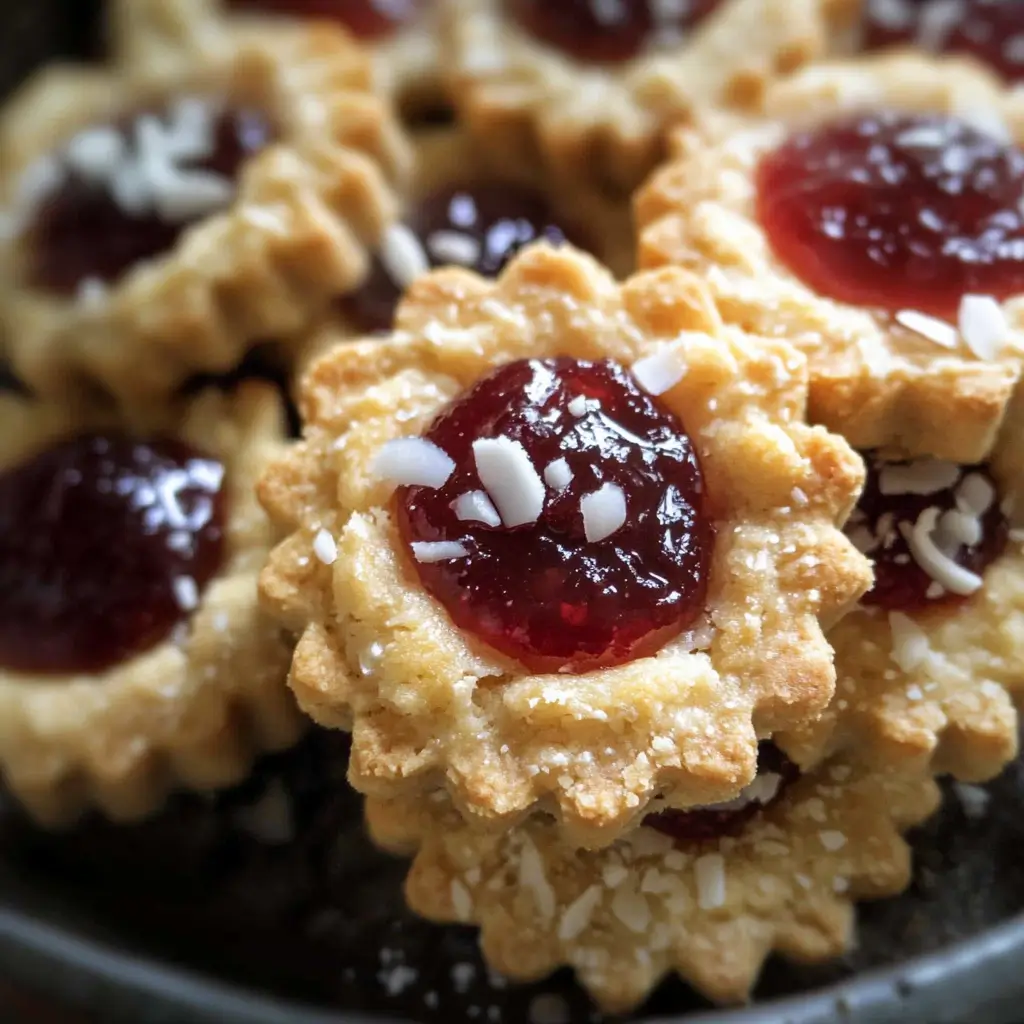
Oh ladies, prepare to fall head over heels for these little bites of heaven! These Jammy Coconut Thumbprint Tartlets are what happen when a classic thumbprint cookie gets dressed up for a special occasion. The buttery shortbread base practically melts in your mouth, while the toasted coconut adds the most delightful texture and nutty flavor. And that jewel-like pool of jam in the center? Pure magic! I first made these for my garden club’s spring luncheon, and I’m not exaggerating when I tell you they disappeared faster than chocolate at a book club meeting!
Trust me on this one – these adorable little tartlets will be your new go-to when you want something that feels special but doesn’t require a pastry chef degree. The best part? You probably have most of the ingredients in your pantry right now!
Table of Contents
Why You’ll Love This Recipe
- Perfect balance of textures – The buttery-crisp tartlet shell, chewy toasted coconut, and smooth jammy center create the most satisfying bite.
- Make-ahead friendly – You can prepare the dough and even bake the shells in advance, making these perfect for entertaining.
- Endlessly customizable – Switch up your jam flavors to match the season or your mood – raspberry for Valentine’s Day, apricot for summer, fig for fall!
- Impressive without being difficult – These look like they came from a fancy bakery but are actually quite straightforward to make.
Ingredients
Butter – Use the good stuff here! Unsalted gives you better control over the final flavor. Make sure it’s at room temperature for that perfect creamy texture when beaten.
Sugar – Plain granulated sugar gives us that sweet foundation. The slight graininess also helps create those melt-in-your-mouth shortbread vibes.
Vanilla extract – Pure, not imitation, for that warm, aromatic flavor that makes everything better.
Almond extract – Just a touch! This secret ingredient adds a subtle complexity that makes people say, “Hmm, what IS that amazing flavor?”
All-purpose flour – The backbone of our tartlet shells. No need for anything fancy here.
Salt – Don’t skip this! Even sweet treats need a little salt to balance the flavors and make everything pop.
Shredded coconut – We’re using sweetened here for extra flavor and that gorgeous golden color when toasted. Make sure to get the finely shredded kind for the best texture.
Assorted jams – Here’s where you can get creative! Raspberry, strawberry, apricot, blackberry – whatever makes your heart sing. High-quality jam makes a difference here since it’s front and center.
Powdered sugar – For that lovely final dusting that makes these look absolutely professional.
The full ingredient list with measurements will be available in the recipe card below.
How to Make Coconut Thumbprint Tartlets
Prepare the Tartlet Dough
- In a large bowl, beat room temperature butter and sugar until light and fluffy, about 2-3 minutes.
- Add vanilla and almond extracts, beating until well combined.
- In a separate bowl, whisk together flour and salt.
- Gradually add the flour mixture to the butter mixture, mixing on low speed just until combined.
- Fold in half of the coconut (save the rest for toasting).
- Wrap the dough in plastic wrap and chill for at least 30 minutes, or up to 24 hours.
Toast the Coconut
- Preheat your oven to 350°F.
- Spread the remaining coconut in a thin layer on a baking sheet.
- Bake, stirring every 2 minutes, until the coconut is golden brown and fragrant, about 5-7 minutes total.
- Watch it carefully – coconut can go from perfectly toasted to burnt in seconds!
- Remove from the oven and let cool completely.
Form and Bake the Tartlets
- Preheat (or maintain) oven at 350°F and lightly grease a mini muffin tin.
- Remove dough from refrigerator and let sit for 5-10 minutes to slightly soften.
- Roll dough into 1-inch balls and place each ball in a mini muffin cup.
- Using your thumb or the back of a rounded measuring spoon, press into the center of each ball to create a well.
- Bake until the edges are just beginning to turn golden, about 10-12 minutes.
- While still warm, gently reinforce the indentation with the back of a measuring spoon if needed.
- Cool in the pan for 5 minutes, then carefully transfer to a wire rack to cool completely.
Fill and Finish
- Once tartlets are completely cool, fill each indentation with about 1/2 teaspoon of your favorite jam.
- Sprinkle the toasted coconut around the edges of the jam.
- Just before serving, dust lightly with powdered sugar for that extra special touch.
Pro Tips for Making the Recipe
- The colder the dough, the better – If the dough gets too soft while you’re working with it, pop it back in the refrigerator for 10 minutes.
- Don’t overwork the dough – Mix just until combined to keep the tartlets tender. Overworked dough becomes tough.
- For perfect indentations – If the centers puff up during baking (they sometimes do!), gently press them back down while the tartlets are still warm from the oven.
- Jam technique – Warm your jam slightly (about 10 seconds in the microwave) to make it easier to spoon into the tartlets.
- Make them fancy – For special occasions, try using two different complementary jams in each tartlet for a beautiful swirled effect.
How to Serve
These delightful little tartlets are perfect for so many occasions! For afternoon tea, arrange them on a pretty tiered stand alongside finger sandwiches and fresh berries. They’re also wonderful for baby or bridal showers – you can coordinate the jam colors with your theme!
For a dessert table, create a stunning display by arranging tartlets with different colored jams in a pattern or ombré effect. Add a few sprigs of fresh mint for color contrast.
These pair beautifully with coffee, tea, or even a glass of prosecco for special celebrations. For a truly indulgent dessert course, serve them alongside a scoop of vanilla ice cream or a dollop of lightly sweetened whipped cream.
Make Ahead and Storage
Refrigerator Storage
The unbaked dough can be refrigerated for up to 3 days, tightly wrapped in plastic. The baked unfilled tartlet shells will keep in an airtight container at room temperature for 2-3 days. Once filled with jam, the tartlets are best enjoyed within 24 hours, though they’ll keep in the refrigerator for up to 3 days (the shells will soften slightly but will still be delicious).
Freezer Friendly?
Absolutely! The unbaked dough can be frozen for up to 3 months – just thaw overnight in the refrigerator before using. The baked unfilled tartlet shells also freeze beautifully for up to 1 month. I don’t recommend freezing the filled tartlets as the jam can become runny upon thawing.
Make-Ahead Strategy
For entertaining, my favorite approach is to make and bake the shells up to 2 days ahead, store them in an airtight container, then fill them with jam and garnish with toasted coconut the morning of your event. Add the powdered sugar dusting right before serving for the freshest look.
FAQs
Can I make these tartlets larger or as a full-sized tart?
Absolutely! This versatile dough works beautifully in different sizes. For standard muffin tins, use about 2 tablespoons of dough per cup and increase the baking time to 15-18 minutes. For a full-sized tart (9-inch), press the dough evenly into your tart pan, dock the bottom with a fork, and blind bake it at 350°F for about 20-25 minutes until golden. Once cooled, spread a thin layer of jam across the bottom and sprinkle with toasted coconut. The larger formats make a gorgeous dessert that can be sliced and served with a dollop of whipped cream or a scoop of ice cream!
I don’t have almond extract. Can I substitute something else or leave it out?
The almond extract adds a lovely subtle flavor that complements the coconut beautifully, but you have options if you don’t have any on hand! You can simply omit it and increase the vanilla extract to 1½ teaspoons for a classic vanilla flavor. Alternatively, try coconut extract to amplify the tropical notes, or a touch of lemon or orange zest for a citrusy twist. If you have amaretto liqueur, a teaspoon of that makes a wonderful substitute for almond extract. Each variation creates a slightly different flavor profile, but all will be delicious with the jammy center!
What’s the best jam to use, and can I use homemade preserves?
Homemade preserves work beautifully in these tartlets and are actually my preference when I have them on hand! The slightly looser texture of homemade jam often creates that perfect glossy pool in the center. As for flavors, it’s truly whatever you love best, but some standout combinations include: raspberry jam with the coconut (classic and vibrant), apricot preserves (the slight tartness balances the sweet cookie), blackberry jam (dramatic color and bold flavor), or fig preserves (sophisticated and not too sweet). For a special holiday twist, try cranberry preserves with a tiny sprinkle of orange zest mixed in!
My tartlets cracked while baking. What did I do wrong and how can I fix it?
Don’t worry, this happens to the best of us! Cracking usually occurs for a couple of reasons: either the dough was too cold when it went into the oven, causing it to contract too quickly, or the indentations were pressed too deeply, weakening the structure. For your current batch, a little “cosmetic surgery” works wonders – simply fill the cracks with a bit of melted white chocolate before adding the jam, which not only fixes the appearance but also adds a delicious flavor element and prevents jam from leaking. For your next batch, let the dough balls sit at room temperature for about 10 minutes before forming the wells, and don’t press too forcefully when making the indentations. If you still get minor cracks, remember that most will be hidden once you add the jam and coconut topping!
Jammy Coconut Thumbprint Tartlets
Equipment
- Mini muffin tin
- Mixing bowls
- Electric mixer
- Spatula
- Wire Cooling Rack
Ingredients
For the Dough
- 1 cup unsalted butter room temperature
- 1/2 cup granulated sugar
- 1 tsp vanilla extract
- 1/4 tsp almond extract
- 2 1/4 cups all-purpose flour
- 1/4 tsp salt
- 1 cup sweetened shredded coconut divided
For Assembly
- 1/2 cup assorted jams raspberry, apricot, or fig
- powdered sugar for dusting
Instructions
- In a large bowl, beat butter and sugar until light and fluffy, 2–3 minutes.
- Add vanilla and almond extract; mix until combined.
- In a separate bowl, whisk together flour and salt. Gradually add to butter mixture and mix just until combined.
- Fold in half of the shredded coconut. Wrap dough and chill for at least 30 minutes.
- Preheat oven to 350°F (175°C). Toast remaining coconut on a baking sheet for 5–7 minutes, stirring often. Let cool.
- Grease mini muffin tin. Roll dough into 1-inch balls and press into each cup to form a well.
- Bake for 10–12 minutes or until just golden. While warm, reinforce center indentation if needed. Cool completely on wire rack.
- Fill each tartlet with 1/2 tsp of jam. Sprinkle toasted coconut around edges.
- Dust lightly with powdered sugar just before serving.