This post may contain affiliate links. As an Amazon Associate, we earn from qualifying purchases. We only recommend products we trust.
This no-bake Christmas peppermint pie is a festive holiday dessert that combines cool, refreshing peppermint flavor with a rich, creamy filling and chocolate cookie crust. With its stunning red and white swirls and crushed candy cane topping, this easy peppermint pie looks like it came from a bakery but requires no baking and minimal effort. Perfect for holiday gatherings, Christmas dinner, or any winter celebration, this make-ahead dessert is ready in just 15 minutes of active prep time and chills to perfection while you prepare the rest of your meal.
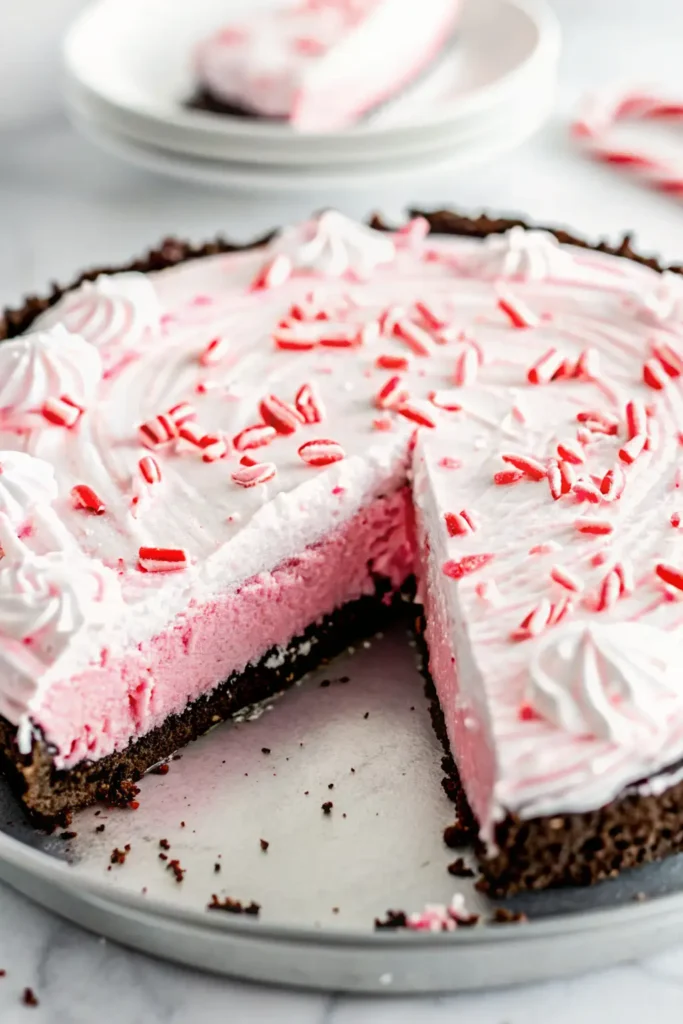
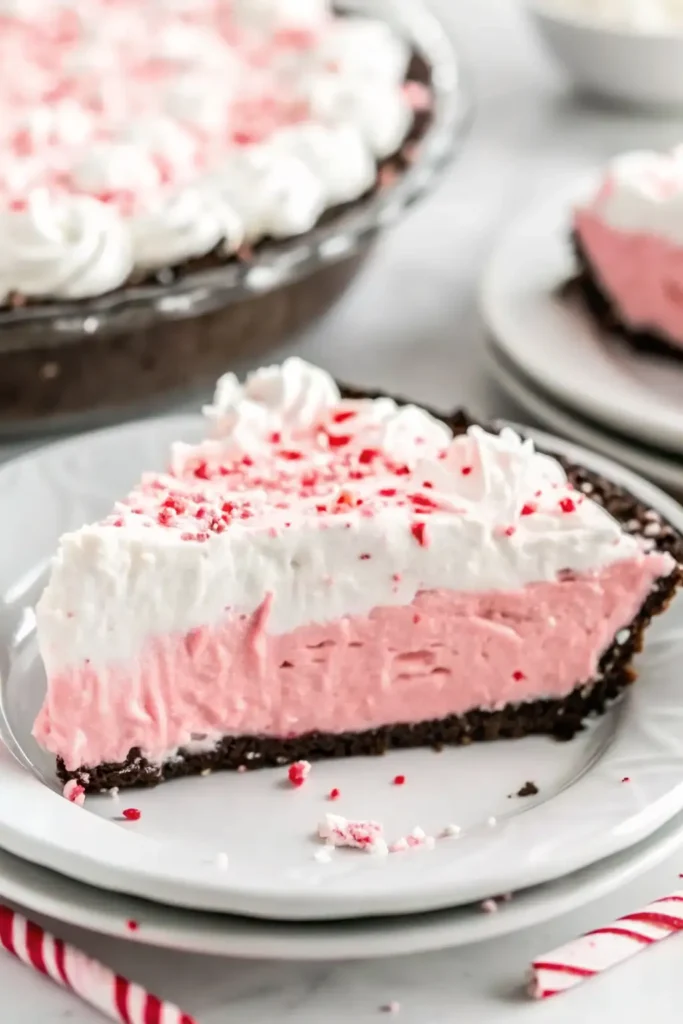
The beauty of this peppermint cream cheese pie lies in its simplicity and impressive presentation. The smooth, velvety filling features tangy cream cheese balanced with sweet whipped cream and bright peppermint extract. An Oreo cookie crust provides the perfect chocolatey contrast to the cool mint filling, while crushed peppermint candies add festive crunch and visual appeal. Best of all, this no-bake pie can be made up to two days ahead, making it ideal for stress-free holiday entertaining.
Table of Contents
Why This Peppermint Pie Recipe is Perfect for the Holidays
This Christmas peppermint pie checks all the boxes for busy holiday bakers. Since it requires no oven time, you can prepare it even when your oven is occupied with the main course or other desserts. The hands-on time is minimal—just 15 minutes of mixing and assembling—then the refrigerator does all the work while the pie sets to creamy perfection.
The make-ahead friendly nature of this recipe is a game-changer during the hectic holiday season. Prepare the pie one or two days before your gathering, cover it, and refrigerate until serving time. This frees up precious time on the day of your event for other preparations. Unlike many holiday desserts that require precise timing, this peppermint pie actually benefits from extended chilling time, which allows the flavors to meld beautifully.
The visual impact of this dessert cannot be overstated. The vibrant pink filling topped with white Cool Whip and sparkling crushed peppermint creates a show-stopping presentation that looks professionally made. Guests are always impressed by the beautiful appearance and delighted by the refreshing peppermint-chocolate flavor combination.
Ingredients for No-Bake Peppermint Pie
Crust:
- 1 Oreo pie crust (9-inch, store-bought or homemade)
Filling:
- 2 packages (8 oz each) cream cheese, softened to room temperature
- 1 1/2 cups powdered sugar
- 1 teaspoon peppermint extract
- 2 teaspoons vanilla extract
- 10 drops red food coloring (optional)
- 1/2 cup crushed peppermint candies or candy canes
- 1 cup heavy whipping cream
Topping:
- 1 container (8 oz) Cool Whip, thawed
- Crushed peppermint candies for garnish
Understanding the Key Ingredients
Cream Cheese: This is the foundation of your peppermint pie filling, providing richness, tanginess, and structure. Always use full-fat block cream cheese—not cream cheese spread from a tub or low-fat varieties. Block cream cheese has the proper consistency and fat content to create a stable, smooth filling that holds its shape when sliced. The cream cheese must be fully softened to room temperature (at least 1-2 hours on the counter) to blend smoothly without lumps. If you’re pressed for time, cut the cream cheese into small cubes to speed softening, but never microwave it as this can create an uneven, grainy texture.
Heavy Whipping Cream: Fresh whipped cream adds airiness and luxurious texture to the filling. Heavy whipping cream (also called heavy cream) has the highest fat content, which means it whips up beautifully and holds its shape. Make sure the cream is cold when whipping—chilled cream and a cold bowl produce the best results. Whip only until stiff peaks form; overwhipping can cause the cream to turn grainy or even separate into butter.
Peppermint Extract: This concentrated flavoring provides the signature minty taste. Start with the recommended 1 teaspoon and taste before adding more—peppermint extract brands vary significantly in strength. Too much extract can make the pie taste medicinal or like toothpaste. If you’re unsure, start with 3/4 teaspoon and add more to taste. Pure peppermint extract tastes cleaner than imitation versions.
Crushed Peppermint Candies: Candy canes or peppermint starlight mints add festive flavor, color, and delightful crunch throughout the pie and on top. To crush candies easily, place unwrapped candies in a heavy-duty zip-top bag and crush with a rolling pin or meat mallet. Aim for small pieces rather than powder—larger pieces provide pleasant texture while powder will dissolve into the filling.
Oreo Pie Crust: The chocolate cookie crust provides the perfect flavor contrast to the cool peppermint filling. Store-bought Oreo crusts are convenient and work beautifully, but you can make your own by crushing 24 Oreos (filling included) and mixing with 4 tablespoons melted butter, then pressing into a 9-inch pie pan.
Cool Whip: This stabilized whipped topping creates a fluffy, snowy layer on top of the pie. While you can substitute with freshly whipped cream (1 cup heavy cream whipped with 2 tablespoons powdered sugar), Cool Whip holds its shape better and won’t weep or deflate over time.
How to Make Christmas Peppermint Pie
Step 1: Whip the Heavy Cream
Start by whipping the heavy cream in a large, clean bowl. Use an electric mixer on medium-high speed and beat until stiff peaks form—this typically takes 3-4 minutes. You’ll know it’s ready when the cream holds firm peaks that stand straight up when you lift the beaters. The whipped cream should look thick, glossy, and smooth. Set this bowl aside—you’ll fold it into the cream cheese mixture later.
For best results, chill your mixing bowl and beaters in the freezer for 10-15 minutes before whipping. Cold equipment helps the cream whip faster and achieve better volume.
Step 2: Prepare the Cream Cheese Mixture
In a separate medium bowl, beat the softened cream cheese and powdered sugar together using an electric mixer on medium speed. Mix for 2-3 minutes until the mixture is completely smooth, fluffy, and free of lumps. Scrape down the sides of the bowl occasionally to ensure even mixing.
The mixture should look pale and creamy. If you see any lumps, the cream cheese wasn’t softened enough—continue beating on low speed, or briefly mix with a hand mixer until completely smooth.
Step 3: Add Flavorings and Color
Add the peppermint extract, vanilla extract, and red food coloring (if using) to the cream cheese mixture. Beat on medium speed until the color is uniformly distributed throughout—no streaks should remain. The filling should be a lovely pale pink color.
Fold in 1/2 cup of crushed peppermint candies using a spatula. These candy pieces will provide delightful minty crunch throughout the filling. Stir gently but thoroughly to distribute the candy evenly.
Step 4: Combine Whipped Cream and Cream Cheese
This step requires a gentle touch to maintain the airiness of the whipped cream. Add the pink cream cheese mixture to the bowl of whipped cream. Using your electric mixer on the lowest speed, gently blend the two mixtures together just until combined and no white streaks of whipped cream remain visible.
Alternatively, you can fold the mixtures together by hand using a large spatula with gentle folding motions. The goal is to combine them thoroughly while keeping as much air in the mixture as possible for a light, fluffy texture.
Step 5: Fill the Oreo Crust
Pour the pink peppermint filling into the Oreo pie crust, using a spatula to spread it evenly and smooth the top. The filling should come close to the top of the crust but not overflow. If you have excess filling, save it in a small bowl and enjoy it as a bonus treat.
Gently tap the pie pan on the counter a few times to release any air bubbles and help the filling settle evenly into all corners of the crust.
Step 6: Add the Topping
Spread the Cool Whip over the top of the pink filling, creating an even layer that covers the entire surface. Use a spatula to create decorative swirls or peaks if desired—this adds visual interest and makes the pie look professionally finished.
Generously sprinkle crushed peppermint candies over the Cool Whip topping. Press them gently so they adhere to the surface. The red and white candies create a beautiful, festive appearance that screams Christmas.
Step 7: Chill and Set
Cover the pie loosely with plastic wrap (make sure the wrap doesn’t touch the Cool Whip topping) and refrigerate for at least 4 hours, but preferably overnight. This chilling time is crucial—it allows the filling to set properly so the pie slices cleanly and holds its shape. The flavors also meld and improve during this time.
For best results, chill overnight. The pie can be made up to 2 days ahead and stored covered in the refrigerator until serving time.
Pro Tips for Perfect Peppermint Pie
Soften Cream Cheese Properly: Leave cream cheese at room temperature for at least 2 hours before making the pie. Properly softened cream cheese is the key to smooth, lump-free filling.
Don’t Over-Whip the Cream: Stop beating as soon as stiff peaks form. Over-whipped cream becomes grainy and can separate into butter, ruining the texture.
Start with Less Peppermint: Different brands vary in strength. Start with 3/4 teaspoon, taste, and add more if needed. It’s easier to add more than to fix an overly minty pie.
Crush Candy Coarsely: Small chunks add pleasant texture while powder dissolves. Place candies in a sturdy bag and tap with a rolling pin rather than crushing vigorously.
Fold Gently: When combining the whipped cream and cream cheese mixture, use gentle folding motions to preserve the airiness for a light, fluffy texture.
Allow Adequate Chilling: Don’t rush the chilling time. At least 4 hours (preferably overnight) ensures clean slices and proper texture.
Creative Variations and Flavor Twists
Chocolate Peppermint Pie: Add 1/4 cup unsweetened cocoa powder to the cream cheese mixture for a chocolate-mint version. Use a chocolate graham cracker crust instead of Oreo.
Candy Cane Swirl: Reserve some peppermint filling before adding food coloring. Create a marbled effect by dolloping white and pink filling alternately in the crust and swirling with a knife.
Mint Chocolate Chip: Fold in 1/2 cup mini chocolate chips along with the crushed peppermint for extra chocolate flavor and texture.
No Food Coloring Version: Skip the red food coloring for a pristine white filling that’s still delicious. Top with red and green sprinkles for holiday color.
Andes Mint Pie: Replace peppermint candies with chopped Andes mints for a chocolate-mint combination. Use mint chocolate chips instead of peppermint extract.
Cookies and Cream: Add 1/2 cup crushed Oreos to the filling for cookies and cream texture with peppermint flavor.
Graham Cracker Version: Use a graham cracker crust instead of Oreo for a less chocolatey base that lets the peppermint shine.
Serving Suggestions and Presentation
This peppermint pie is rich and creamy, so small slices go a long way. For clean cuts, dip a sharp knife in hot water, wipe dry, and slice. Repeat between each cut for professional-looking slices.
Serve the pie chilled but not frozen. Let it sit at room temperature for 10-15 minutes before slicing—this makes cutting easier and allows the flavors to bloom. The slightly softened texture is more enjoyable than rock-hard frozen filling.
Pair this cool, minty dessert with hot beverages like coffee, hot chocolate, or peppermint mocha. The temperature contrast is delightful. A small dollop of fresh whipped cream on each slice adds extra indulgence, though it’s hardly necessary given how rich this pie already is.
For holiday gatherings, present the whole pie on a decorative cake stand or festive platter. The red and white colors make it a natural centerpiece for your dessert table. Garnish the serving plate with fresh mint leaves or additional crushed candy canes for extra holiday flair.
Storage and Make-Ahead Instructions
Refrigerator Storage: Store the peppermint pie covered in the refrigerator for up to 5 days. Cover loosely with plastic wrap or place in a pie carrier to protect the topping. The pie actually improves after a day or two as flavors meld and the filling sets more firmly.
Freezer Storage: This pie freezes beautifully for up to 2 months. Wrap the entire pie (or individual slices) tightly in plastic wrap, then add a layer of aluminum foil for extra protection. For best appearance, add the crushed peppermint garnish after thawing rather than before freezing, as frozen candy can become sticky.
Thawing Instructions: Transfer frozen pie to the refrigerator and thaw overnight—about 8-12 hours. For slightly quicker thawing, let the pie sit at room temperature for 30-45 minutes after refrigerator thawing. Never thaw in the microwave as this will melt the filling.
Make-Ahead Tips: This is the ultimate make-ahead dessert. Prepare the pie completely 1-2 days before your event and refrigerate. The extended chilling time actually improves texture and allows flavors to develop fully. Simply remove from the refrigerator 10-15 minutes before serving for easier slicing.
Frequently Asked Questions
Can I make this pie without food coloring? Absolutely! The red food coloring is purely decorative. The pie tastes just as delicious in its natural cream color. You can still achieve a festive look with the peppermint candy garnish.
What size pie crust should I use? Use a standard 9-inch pie crust. This recipe fills a 9-inch crust perfectly. If using an 8-inch crust, you may have extra filling.
Can I use homemade whipped cream instead of Cool Whip? Yes! Whip 1 cup heavy cream with 2 tablespoons powdered sugar until stiff peaks form. However, homemade whipped cream can weep over time, so use Cool Whip if making more than a day ahead.
Why is my filling runny? The cream cheese likely wasn’t softened enough, or the mixture wasn’t chilled long enough. Ensure the cream cheese is fully room temperature and chill the pie for at least 4 hours (preferably overnight).
Can I leave the crushed peppermint out of the filling? Yes! Some people prefer the candy only as garnish on top. The filling will still taste delicious with just the peppermint extract for flavor.
How do I prevent lumps in the filling? Use fully softened, room temperature cream cheese and beat it thoroughly with the powdered sugar before adding other ingredients. If lumps appear, continue beating or use a hand mixer.
Can I make this dairy-free? You can try dairy-free cream cheese, coconut whipping cream, and dairy-free Cool Whip, though results may vary in texture and taste compared to the original recipe.
This no-bake Christmas peppermint pie is the perfect holiday dessert that combines ease, elegance, and irresistible flavor. With its creamy peppermint filling, chocolate cookie crust, and festive appearance, it’s guaranteed to become a new holiday tradition. Make it ahead, relax, and enjoy the compliments when you serve this stunning dessert!
Christmas Peppermint Pie (No-Bake)
Equipment
- Electric mixer
- Mixing bowls
- Rubber Spatula
- Measuring Cups and Spoons
- Pie dish or store-bought Oreo crust
- Plastic wrap
- Refrigerator
Ingredients
- Crust
- 1 9-inch Oreo pie crust (store-bought or homemade)
- Filling
- 16 oz cream cheese, softened to room temperature
- 1 1/2 cups powdered sugar
- 1 tsp peppermint extract
- 2 tsp vanilla extract
- 10 drops red food coloring (optional)
- 1/2 cup crushed peppermint candies or candy canes
- 1 cup heavy whipping cream
- Topping
- 8 oz Cool Whip, thawed
- 2 tbsp crushed peppermint candies, for garnish
Instructions
- In a chilled bowl, whip the heavy cream using an electric mixer on medium-high speed until stiff peaks form, about 3–4 minutes. Set aside.
- In another bowl, beat softened cream cheese and powdered sugar together for 2–3 minutes until smooth and lump-free.
- Add peppermint extract, vanilla extract, and red food coloring (if using). Mix until evenly combined, then gently fold in the crushed peppermint candies.
- Fold the cream cheese mixture into the whipped cream using a spatula until just combined and fluffy. Avoid overmixing to preserve airiness.
- Spread the peppermint filling evenly into the Oreo crust, smoothing the top. Gently tap to release any air pockets.
- Spread Cool Whip evenly over the top of the filling and sprinkle with crushed peppermint candies for garnish.
- Refrigerate the pie for at least 4 hours, preferably overnight, to allow the filling to set. Slice with a warm knife for clean edges and serve chilled.