This post may contain affiliate links. As an Amazon Associate, we earn from qualifying purchases. We only recommend products we trust.
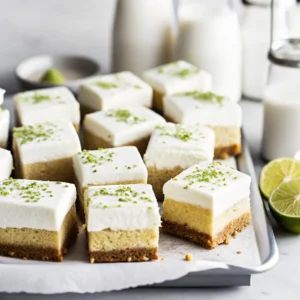
Imagine biting into a bar that tastes like a tropical vacation—tart, sweet, and impossibly creamy. These key lime pie bars are exactly that. They’re easier than traditional key lime pie (no pie crust required), they come together in about 30 minutes of prep time, and they taste so elegant your guests will think you spent hours in the kitchen. The best part? They’re make-ahead friendly and freeze beautifully, so you can have them ready for any occasion. Whether you’re hosting a summer dinner party, packing a picnic, or just craving a refreshing citrus treat on a hot day, these bars deliver tropical flavors every single time.

Table of Contents
Why You’ll Love These Key Lime Pie Bars
✨ Tangy-Sweet Perfection – The balance of tart lime juice and sweet condensed milk creates that irresistible flavor that makes your mouth water 🥧 No Pie Pan Needed – Easier to slice, serve, and transport than traditional pie ⏱️ Just 30 Minutes Prep – Most of the time is waiting for them to chill in the fridge 🥄 Only 9 Simple Ingredients – No fancy techniques or hard-to-find items 🍋 Restaurant-Quality Results – Looks and tastes like you hired a pastry chef ❄️ Perfect Summer Dessert – Light, refreshing, and best served ice cold 👥 Crowd-Pleaser – Sweet enough for dessert lovers, tart enough for citrus fans 🔄 Make-Ahead Friendly – Bake the day before or freeze for up to 3 months
Equipment You’ll Need
One 8×8 inch or 9×9 inch square metal baking pan Parchment paper Food processor (or blender for crumbs) Medium mixing bowl Large mixing bowl Whisk or fork Wire cooling rack Measuring cups and spoons Sharp knife for slicing Optional: Stand mixer for whipped cream topping
Ingredients
For the Graham Cracker Crust
1½ cups (170g) graham cracker crumbs (about 12 full crackers) ⅓ cup (80g) unsalted butter, melted 2 tbsp granulated sugar 1 tbsp light brown sugar ⅛ tsp sea salt
For the Key Lime Filling
One 14-oz (397g) can sweetened condensed milk 3 large egg yolks (or 4 egg yolks for richer flavor) ½ cup (120ml) fresh key lime juice (about 12-15 key limes) 1 tbsp fresh key lime zest ½ tsp vanilla extract Pinch of sea salt
For the Whipped Cream Topping
1 cup (240ml) heavy whipping cream, chilled 2 tbsp powdered sugar ½ tsp vanilla extract ½ tsp lime zest for garnish (optional but beautiful)
Shopping Tips: Fresh key lime juice makes a huge difference in flavor—avoid bottled juice if possible. If you can’t find fresh key limes, use bottled key lime juice (Nellie & Joe’s is excellent). Don’t substitute regular Persian limes; they have a different flavor profile. Look for key limes that are fragrant and yield slightly to pressure.
Instructions: How to Make Key Lime Pie Bars
Prepare Your Pan (5 minutes)
Step 1: Line and Position Preheat your oven to 350°F (175°C). Line an 8×8 inch or 9×9 inch square metal baking pan with parchment paper, leaving about 2 inches of overhang on two opposite sides. This creates a “sling” that makes removing the bars incredibly easy. Spray the parchment with non-stick cooking spray.
Step 2: Make the Crust Base In a food processor, pulse graham crackers until they resemble fine breadcrumbs (no large chunks). If you don’t have a food processor, place crackers in a sealed bag and crush with a rolling pin until fine. You should have about 1½ cups of crumbs.
Make the Graham Cracker Crust (8 minutes)
Step 3: Combine Crust Ingredients In a medium bowl, combine graham cracker crumbs, melted butter, granulated sugar, brown sugar, and salt. Stir with a fork until every crumb is moistened with butter. The texture should resemble wet sand—if it’s too dry, add a touch more melted butter.
Step 4: Press Into Pan Pour the crust mixture into your prepared pan. Using the back of a measuring cup or a sturdy spoon, press the mixture firmly and evenly into the bottom of the pan, creating a solid, compact layer about ¼ inch thick. Make sure the corners are packed well. This firm crust prevents it from crumbling when you slice the bars later.
Step 5: Pre-Bake the Crust Bake the crust alone for 7-10 minutes until it turns golden brown around the edges and smells fragrant. This pre-baking step is essential—it helps the crust stay crispy once the wet filling is added. Remove from the oven and let cool slightly while you prepare the filling (about 5 minutes).
Make the Filling (8 minutes)
Step 6: Combine the Wet Ingredients In a large bowl, whisk together the sweetened condensed milk, egg yolks, vanilla extract, and salt until completely smooth. Use a fork or whisk to break up the yolks and blend everything together. The mixture should be uniform with no streaks of egg white visible.
Step 7: Add the Lime Juice and Zest Add the fresh key lime zest to the filling and stir. Then slowly add the key lime juice while whisking constantly. Add it slowly because the acidity of the juice will begin to thicken the mixture slightly (this is normal and desirable). Whisk until the mixture is smooth, creamy, and uniform in color. You should have a pale, creamy filling.
Step 8: Pour Into Crust Pour the lime filling over the cooled crust. Use a spatula to smooth the top, ensuring an even layer throughout the pan. Tap the pan gently on the counter 2-3 times to release any air bubbles that may have been incorporated while mixing.
Bake (15-18 minutes)
Step 9: Bake the Bars Place the filled pan in the preheated 350°F oven. Bake for 15-18 minutes. The bars are done when the filling is set around the edges but still jiggles slightly in the center (about a 2-inch diameter). The top should look matte, not wet. Don’t overbake—the filling should not brown at all.
Step 10: Cool Gradually Remove the pan from the oven and place on a wire cooling rack. Allow the bars to cool to room temperature, about 30-45 minutes. This gradual cooling prevents cracks and allows the custard texture to set properly.
Chill (Minimum 2 hours, ideally overnight)
Step 11: Refrigerate the Bars Once cooled to room temperature, cover the pan tightly with plastic wrap and refrigerate for at least 2 hours, though overnight is ideal. This chilling time is crucial—it allows the filling to set completely and develop that signature silky custard texture. The longer chill time (overnight) also makes slicing cleaner and easier.
Make the Whipped Cream Topping (5 minutes)
Step 12: Prepare Cold Equipment When ready to serve, place a medium mixing bowl and whisk in the freezer for 5 minutes. Cold equipment helps the cream whip faster and more effectively.
Step 13: Whip the Cream Pour chilled heavy whipping cream into the cold bowl. Using an electric hand mixer or whisk, beat on medium speed until the cream is slightly thickened and soft peaks begin to form (about 1-2 minutes). Add the powdered sugar and vanilla extract, then continue beating until stiff peaks form (another 30-60 seconds). Don’t overbeat or you’ll end up with butter!
Step 14: Remove and Slice Using the parchment paper sling, carefully lift the entire bar slab out of the pan and onto a cutting board. Using a sharp knife dipped in hot water (and wiped clean between cuts), slice the bars into 16 equal pieces (4 cuts down, 4 cuts across). The hot water on the knife helps create clean slices.
Step 15: Top and Garnish Spread or dollop whipped cream on top of each bar. Sprinkle with additional lime zest, a pinch of powdered sugar, or even a tiny lime wheel for a stunning presentation. Serve immediately while cold.
Serving Suggestions
🍽️ Classic Presentation – Top with a generous dollop of fresh whipped cream and a sprinkle of lime zest
❄️ Chilled Perfection – Serve straight from the fridge on hot summer days; the cold is essential
🥄 With Vanilla Ice Cream – A scoop of vanilla ice cream adds richness that complements the tartness
🍃 Garden Garnish – Add fresh mint leaves or edible flowers for an elegant look
🍋 Lime Salt Rim – Mix lime zest with fine sea salt and sprinkle on top for a sweet-salty combination
🍚 With Coconut – Dust with toasted coconut flakes for tropical flair
🍷 Pairing Ideas – Serve with sparkling water, iced tea, light white wine, or crisp ginger ale
🎉 Occasion Ideas – Summer potlucks, BBQs, Mother’s Day, Father’s Day, Easter brunch, birthday parties, baby showers, or casual weeknight dessert
Easy Variations & Customizations
Different Crust Options
Vanilla Wafer Crust – Replace graham crackers with crushed vanilla wafers for a sweeter crust that pairs beautifully with the tart filling Gingersnap Crust – Use crushed gingersnaps instead of graham crackers for warm spice notes Biscoff Cookie Crust – Crush Biscoff cookies with butter for a caramelized, buttery crust Coconut Crust – Mix ½ cup shredded coconut with graham cracker crumbs Almond Crust – Add ¼ cup finely ground almonds to the graham cracker mixture No-Bake Crust Option – Skip the pre-baking step; the crust will be softer but still delicious
Filling Variations
Coconut Key Lime Bars – Add ½ tsp coconut extract to the filling and top with toasted coconut Tequila Key Lime Bars – Add 2 tbsp tequila to the filling and reduce lime juice by 2 tbsp Creamy Version – Replace 2 tbsp lime juice with ¼ cup sour cream for tangier, creamier bars Lemon Key Lime Combo – Use 3 tbsp key lime juice and 3 tbsp lemon juice for extra citrus complexity Egg-Free Version – Substitute 3 tbsp sour cream for the 3 egg yolks (though texture will be slightly different) Sugar-Reduced Version – Use 1 can (14 oz) low-fat sweetened condensed milk instead of regular
Topping Variations
Greek Yogurt Topping – Mix Greek yogurt with powdered sugar for a tangier, protein-packed topping Cream Cheese Frosting – Beat cream cheese with powdered sugar for a richer topping Lime Curd Topping – Spread homemade or store-bought lime curd over the bars before serving Meringue Topping – Top with toasted meringue for an elegant presentation No Topping – Serve plain with a side of whipped cream for guests to add themselves Chocolate Drizzle – Drizzle melted white chocolate over the bars for contrast
Expert Tips for Perfect Key Lime Pie Bars
🍋 Use Fresh Key Lime Juice Fresh key lime juice makes an enormous difference in flavor. If you must use bottled juice (Nellie & Joe’s is the best brand), avoid cheap imitations. The juice should be fresh-squeezed if possible. To juice key limes easily, roll them under your palm on the counter to break down the juice cells, then squeeze firmly.
🥚 Room Temperature Ingredients Matter Bring eggs and all ingredients to room temperature before mixing. Cold ingredients don’t blend smoothly and can create lumps in your filling. This takes about 30 minutes or you can gently warm the sweetened condensed milk in a warm water bath.
🔥 Don’t Overbake the Filling The filling should be set around the edges but still jiggle slightly in the center when you move the pan. Overbaking creates a dry, rubbery texture instead of that silky custard consistency. Err on the side of slightly underbaked—the residual heat and chilling time will finish cooking it.
❄️ Chill Time is Non-Negotiable At least 2 hours in the fridge, though overnight is ideal. This allows the filling to set completely and develop the proper silky texture. Trying to slice them before they’re fully chilled results in a messy, crumbly dessert.
🔪 The Hot Knife Trick Dip your knife in hot water and wipe it clean between each cut. This simple trick creates clean, neat slices. If you don’t have hot water, wipe the knife with a clean, damp cloth.
🍋 The Parchment Sling is Essential That overhang of parchment paper on two sides makes removal incredibly easy. When you’re ready to remove the bars, use it as a sling to lift the entire bar slab out of the pan without breaking or crumbling.
🧂 A Pinch of Salt Enhances Flavor Even though these bars are sweet and tart, a tiny pinch of salt in both the crust and filling enhances the lime flavor and balances the sweetness. Don’t skip this!
📏 Proper Pan Size Matters An 8×8 inch pan makes thicker, more generous bars (perfect for fewer people or more indulgent servings). A 9×9 inch pan makes slightly thinner bars. Either works, but measure your pan to know what you’re making.
🥄 Press the Crust Firmly A loosely pressed crust will crumble when you slice the bars. Take time to press it firmly and evenly into the pan. The bottom of a measuring cup is perfect for this.
✨ Make Them Look Restaurant-Quality Dust with powdered sugar, add lime zest, and serve on a white plate with a garnish of fresh mint. Simple presentation tricks make these look fancy without extra effort.
Storage & Make-Ahead Instructions
Refrigerator Storage
Store bars in an airtight container in the refrigerator for up to 5-7 days. Keep the whipped cream topping separate if storing more than 1 day—add fresh topping just before serving. The bars taste best on days 1-3 after making.
Freezer Storage
These bars freeze beautifully! Freeze the unfrosted bars in an airtight freezer-safe container for up to 3 months. Wrap individual bars in plastic wrap and layer them in a container with parchment paper between layers. Thaw overnight in the refrigerator before serving. Make fresh whipped cream topping after thawing. The whipped cream topping does not freeze well, so always make it fresh.
Make-Ahead Timeline
3 Days Before: Make the entire dessert without the whipped cream topping. Store covered in the fridge. The flavors actually improve over 2-3 days as they meld together.
1 Day Before: Make the crust and baking, plus the filling, bake, and chill. Make the whipped cream topping and store in the fridge (it holds for about 24 hours). Assemble just before serving for best presentation.
Day Of: If using pre-made components, just assemble the bars with fresh whipped cream topping right before serving. Or bake fresh for maximum flavor.
Frequently Asked Questions
Q: Can I use regular limes instead of key limes? A: Not ideally. Key limes have a distinctly different flavor—more aromatic and complex than regular Persian limes. If you absolutely cannot find key limes or key lime juice, you can substitute, but expect a different (less authentic) flavor. Regular limes are larger, less tart, and have a different aroma. Using Nellie & Joe’s bottled key lime juice is better than substituting regular lime juice.
Q: Do I need to use real eggs, or can I use egg substitutes? A: Real eggs work best for proper texture and custard consistency. The egg yolks are crucial for creating that silky filling. If you must avoid raw egg yolks (due to allergies or preference), you can use pasteurized eggs, or substitute 3 tbsp sour cream plus 1 tbsp cornstarch for the yolks. The texture will be slightly different but still delicious.
Q: Can I make these bars without baking the crust first? A: You can skip the pre-baking step, though the crust will be softer and less crispy. Pre-baking helps the crust stay firm and prevents it from soaking up excess moisture from the filling. If you’re short on time, skip it, but the texture won’t be quite as ideal.
Q: What if I don’t have sweetened condensed milk? A: Sweetened condensed milk is pretty specific to this recipe and affects both flavor and texture. You cannot substitute evaporated milk (they are very different). If you truly cannot find it, check the baking aisle at your grocery store. Most stores stock multiple brands year-round.
Q: How do I get clean slices? A: Let the bars chill overnight (the longer, the better). Use a sharp knife dipped in hot water, wiping it clean between cuts. Cut slowly and deliberately—don’t saw back and forth. Cut into the bars with a single downward motion. If slices are crumbling, the bars may not be chilled enough.
Q: Can I double this recipe? A: Absolutely! Use a 9×13 inch pan and double all ingredients. Bake for slightly longer, about 20-22 minutes, since the pan is deeper. Follow the same chilling instructions.
Q: Are these bars no-bake or do they have to be baked? A: These bars are baked, not no-bake. The baking is essential for the filling to set properly. If you want a true no-bake key lime dessert, look for recipes using whipped cream or cream cheese as the base.
Q: Can I make the bars with a different type of sweetener? A: The sweetened condensed milk is essential for both the flavor and the ability of the filling to set. Substituting with honey, maple syrup, or other sweeteners will affect the texture and may prevent the bars from setting properly.
Q: Why are my bars not setting? A: Most likely causes: (1) You didn’t chill them long enough—minimum 2 hours, ideally overnight; (2) Your oven temperature is inaccurate—invest in an oven thermometer; or (3) You’re slicing them before they’re fully set—always chill completely before cutting.
Q: Can I add food coloring to make the bars green? A: You can, though natural key lime filling is pale yellow or cream-colored, not green. Green key lime pie is usually colored, but authentic recipes don’t use it. If you want green bars for aesthetic reasons, add a drop or two of green food coloring or spirulina powder, though it may slightly alter the flavor.
Q: What’s the difference between key lime juice and regular lime juice? A: Key limes are smaller, more aromatic, and have a more complex, slightly sweet flavor. They’re native to the Florida Keys. Regular (Persian) limes are larger, more common, and have a different flavor profile. For authentic key lime pie bars, real key lime juice is important.
Perfect Key Lime Pie Bars
Equipment
- baking pan
- Mixing bowl
- Whisk
- Electric mixer
Ingredients
- 1.5 cups graham cracker crumbs
- 0.33 cup butter, melted
- 3 tbsp sugar
- 1 can sweetened condensed milk
- 3 egg yolks
- 0.5 cup key lime juice
- 1 tbsp lime zest
- 1 cup heavy cream
- 2 tbsp powdered sugar
- 0.5 tsp vanilla extract
Instructions
- Preheat oven to 350°F (175°C). Mix graham cracker crumbs, melted butter, and sugar. Press into a baking pan and bake for 7–10 minutes.
- Whisk together sweetened condensed milk, egg yolks, key lime juice, and lime zest until smooth.
- Pour filling over the warm crust and spread evenly.
- Bake for 15–18 minutes until just set.
- Cool to room temperature, then refrigerate for at least 2 hours until firm.
- Whip heavy cream with powdered sugar and vanilla until soft peaks form.
- Spread or pipe whipped cream over chilled bars, slice, and serve.